Sunday, May 18, 2008

Template

Here is link which suverys browser-side templating: http://ajaxpatterns.org/Browser-Side_Templating.
The goal of browser-side templating is to separate presentation and logic. And in my application, I think it will be helpful to use browser-side templating to ease the development. Currently, JSON messages are received from server and then formatted accordingly to display them to end users.

In next step, I would like to try JTL(Javascript Template Library) http://code.google.com/p/trimpath/wiki/JavaScriptTemplates.

Monday, May 12, 2008

OpenID

Some text is excerpted from Official Specification.

[Resources]

Official web site: http://openid.net
Authentication specification: http://openid.net/specs/openid-authentication-2_0.html
Following is a very good and detailed tutorial about how to develop a web site which makes use of OpenID: http://www.plaxo.com/api/openid_recipe.
Libraries written in various languages: http://wiki.openid.net//Libraries.
This web site lists many web sites which support OpenID: http://openiddirectory.com/.

[Introduction]
       Previously, when we visit some web sites and want to leave comments, generally we need to sign up an account at first. This is kind of annoying because we might just surf the web and we might not visit the website again in the future. Applying for a new account is not a big deal.
       By using OpenID, we can be authenticated in a new web site by signing in an OpenID provider (e.g. Blogger, Flickr, Youtube…) with existing account. In other words, we could use the same account to log in to multiple web sites/applications. Generally, most of users have account in prevailing OpenID providers. These providers (e.g. Flickr, Youtube ...) provide their own core compelling services (e.g. video sharing, picture share…) besides OpenID support. Besides, there are some new sites which mainly provide OpenID support (e.g. myopenid.com,).
       An assumption is that OpenID providers are trusted by various OpenID-aware web applications.
       The advantage of OpenID is that:
       Users can use OpenID to log in to multiple web sites which support OpenID without having to apply for an account. As a result, users don’t need to remember large number of usernames and passwords, which improves user experience greatly.

       The mechanisms used to achieve the goal are: redirection and callback.

[Architecture]
image

1) Background
There are two kinds of communication: direct request and indirect request.
Direct request: one party sends request directly to another party to get response. The message must be encoded as a POST body.
Indirect request: one party sends request to another party by redirecting user agent to the destination party with request data (query string or POST body).
There are two mechanisms which can be used to send indirect request: HTTP indirection or form redirection.
HTTP redirec:
       “Data can be transferred by issuing a 302, 303 or 307 HTTP redirect to the end user’s agent. The redirect URL is the URL of the receiver with the OpenID authentication message appended to the query string.”
HTTP Form redirection
       A HTML page which contains an HTML form element can be returned to user. And the form contains a mapping of keys to values. Javascript can be used to automate submission of the form to implement redirection.
More info: http://openid.net/specs/openid-authentication-2_0.html#anchor6

2) Procedure
First, the Relying Party presents the user with a form that has a field for entering User-Supplied Identifier. The form field’s name should be “openid_identifier” so that user agents can detect it automatically and provide some extra functionality.

Steps:

(1)    The user submits the from to Relying Party
After receiving data submitted by user, Relying Party normalizes the input data and then discovers OP endpoint URL based on user-supplied identifier.

(2)    This step is optional. Relying Party can build an association with OP.
An association establishes a shared secret between them which is used to verify subsequent protocol messages and reduce round trips.
More info: http://openid.net/specs/openid-authentication-2_0.html#associations

(3)     Relying Party sends authentication request to user agent.
User agent sends authentication request to OP. Then user is authenticated by the OP.
These two sub steps jointly do this: Relying Party send an authentication request to the OP to obtain an assertion. This is an indirect request. So the request actually is sent by Relying Party to user agent and then redirected to OP.
Generally, OP will display a web page which enable user to accept or deny access request from Relying Party.

(4)    OP sends authentication response to user agent and then user agent sends response to Relying Party.

(5)    After receiving authentication response from OP (indirect communication), Relying Party verifies it and judge whether it is a positive assertion or negative assertion.

More info: http://openid.net/specs/openid-authentication-2_0.html#responding_to_authentication

[More]
       Besides authentication, personal information (e.g. gender, location, age …) can be transferred between Relying Party and OpenID provider as well. Then Relying Party can pre-fill some registration fields so that users don’t need to type the same information many times. Of course, Relying Party needs to convert information from OpenID provider to its own format.

[Delegation]
Delegation is also possible: http://simonwillison.net/2006/Dec/19/openid/. It means users may want to delegate their OpenID to another provider behind-the-scenes. An example from http://www.plaxo.com/api/openid_recipe:
       “If I try to sign up with the OpenID josephsmarr.com, I may have actually delegated that URL to a different OpenID like jsmarr.myopenid.com, and when the provider returns to you to complete authentication, you need to remember that I wanted to sign up as josephsmarr.com and not jsmarr.myopenid.com.”
Key thing is that you add following two lines of HTML code to your delegation HTML page:
      
<link rel="openid.server" href="http://openid.server">
    <link rel="openid.delegate" href="http://delegation.site">
You should replace the value of href attributes accordingly.

This mechanism actually adds an additional layer which separates Relying party and OpenID provider. Relying Party gets OpenID endpoint URL by accessing your delegation HTML page. After getting value of open.server and openid.delegate, Relying Party can sends authentication request to corresponding OpenID provider. You can easily switch your preferred OpenID provider by modifying value of attribute href in link elements.

[Myth]
       OpenID is a mechanism which can authenticate users by delegating it to corresponding OpenID provider. So it is not appropriate to use it directly in a third-party application which sits on top of an existing service and wants to access the backend service on behalf of the user. For example, if a web site makes use of Youtube API to do some cool things, it necessarily needs users’ information to utilize Youtube on behalf of the user. OpenID does not solve this problem.
       But, in my opinion, this can be done by extending OpenID specification. In authentication response, OpenID provide can include an auth token which can be used as a handle by Relying Party to access service provided by the OpenID provider on behalf of the user. In addition, access level (Read, Write, Delete …) must be negotiated as well.
       However, the extension deviates from gist of OpenID because authorization delegation is involved besides authentication.

Saturday, May 10, 2008

Youtube API usage

Authentication

       http://code.google.com/apis/youtube/developers_guide_protocol.html
       It is recommended that you include the proper authentication headers in all of your requests even if those requests do not explicitly require authentication.
       A request must include the X-GData-Key and Authorization headers.
       The X-GData-Key header specifies your developer key, a value that uniquely identifies your application(s). The Authorization header specifies a token that you obtain for each user using one of two authentication schemes, AuthSub or ClientLogin. Headers are like this:

AuthSub

ClientLogin

Authorization:AuthSub token=<authentication_token>

X-GData-Key: key=<developer_key>

Authorization:GoogleLogin auth=<authentication_token>

X-GData-Key: key=<developer_key>

(1)    Functions supported in AuthSub
http://code.google.com/apis/accounts/docs/AuthForWebApps.html

(1.1)           AuthSubRequest

       A call to this method sends the user to a Google Accounts web page, where the user is given the opportunity to log in and grant Google account access to the web application. If successful, Google provides a single-use authentication token, which the web application can use to access the user's Google service data. This is done by using GET to a specific formatted URL.

Sample URL

https://www.google.com/accounts/AuthSubRequest?scope=http%3A%2F%2Fgdata.youtube.com&next=http%3A%2F%2Fzhguo.blogspot.com

(1.2)           AuthSubSessionToken

       A call to this method allows the web application to exchange a single-use token for a session token.

Sample request
       curl https://www.google.com/accounts/AuthSubSessionToken --header ‘Authorization: AuthSub token="token"’

Response

Token=DQAA...7DCTN

Expiration=20061004T123456Z

(1.3)          AuthSubRevokeToken

       A call to this method revokes a session token. Once a token is revoked it is no longer valid.

Sample Request
       curl https://www.google.com/accounts/AuthSubRevokeToken --header ‘Authorization: AuthSub token="token"’ 

(1.4)           AuthSubTokenInfo.

       A call to this method verifies whether a specified session token is valid and returns data associated with the token. This operation applies to both one-time-use and session keys.

Sample request

         curl https://www.google.com/accounts/AuthSubTokenInfo --header 'Authorization: AuthSub token="CO7xhO-6GhDT5f2tAwd"'

Sample response

Target=http://www.yourwebapp.com

Scope=http://www.google.com/calendar/feeds/

Secure=true

(2)    ClientLogin

       http://code.google.com/apis/accounts/docs/AuthForInstalledApps.html

       Before using ClientLogin, you must have an existing Google account. The POST request should be structured as a form post with the default encoding application/x-www-form-urlencoded. Parameters should be included in the body of the post.

Action URL parameter: https://www.google.com/accounts/ClientLogin

Sample request format:

POST /accounts/ClientLogin HTTP/1.0

Content-type: application/x-www-form-urlencoded


accountType=HOSTED_OR_GOOGLE&Email=jondoe@gmail.com&Passwd=north23AZ&service=cl&source=Gulp-CalGulp-1.05

CURL command
       curl    --location https://www.google.com/youtube/accounts/ClientLogin 
                   --data 'Email=username&Passwd=password&service=youtube&source=Test'
                   --header 'Content-Type:application/x-www-form-urlencoded' -i

Sample Response:

SID=DQAAAGgA...7Zg8CTN

LSID=DQAAAGsA...lk8BBbG

Auth=DQAAAGgA...dk3fA5N

 (3)    Difference of two mechanisms

       To use ClientLogin, a third-party application must own Youtube’s username and password of every user. Then the third-party application can do anything the end user can do. This mechanism is convenient for third-party apps to use because it does not require much intervening from users. However, it requires trust of users who may be afraid that their person information is not stored appropriately.

       To use AuthSub, a third-party does not need to own Youtube’s username and password of user. Instead, the user will be redirected to a web site from google to authorize third-party app’s access to user’s account. At first, third-party app is given a one-time access key which can be used to exchange a session key that can be used longer. This method is more secure for users at the cost of manually authorizing access requests.

Some development detail

(1)    Some videos are not allowed to be embedded in third-party applications.

       In the feed of these videos, mediagroup::content element does not exist!!! I manually construct URL by concatenating http://gdata.youtube.com/feeds/api/videos/ and video id and try to embed it into my app. As I expect, it does not work. However, I figured out a method which can work around this problem. I concatenate http://www.youtube.com/swf/l.swf?video_id= and video id and it works.

(2)    Some videos are not allowed to be commented by some users. These videos should be handled carefully.

       http://gdata.youtube.com/feeds/api/videos/gmNbl5ZTBZE

(3)    Duplicate elimination

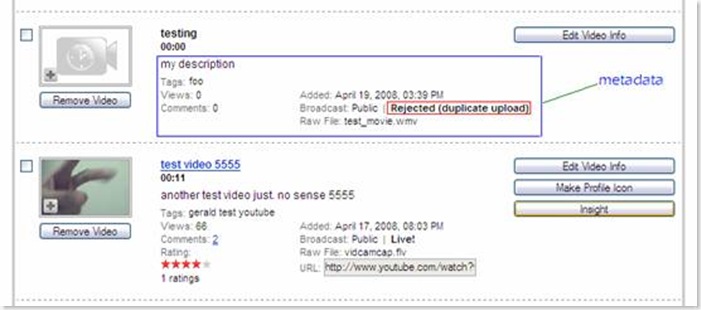
       If you upload the same video clip more then once using different metadata, Youtube can figure it out and all uploads but the first one will be rejected. I am not sure how they compare two different video clips, maybe using MD5 to calculate a signature. The duplicate uploads are still displayed in your account. And all metadata is preserved except the video clip itself. The only difference between original upload and following duplicate uploads is that you can not play duplicate video clips.
clip_image002

As shown in above picture, metadata (e.g. description, tags, views, published time…) are still there. But the video clip itself is rejected

(4)    OpenSearch support

       If you search videos on Youtube, in returned feed openSearch extension is supported:

<openSearch:totalResults>274842</openSearch:totalResults>

<openSearch:startIndex>1</openSearch:startIndex>

<openSearch:itemsPerPage>25</openSearch:itemsPerPage> 

(5)    Navigation of many returned results.

       In returned feeds, if not all results are returned, there should be a link element in the feed. It is like this:

<link rel="next" type="application/atom+xml" href="http://... "/>

<link rel="previous" type="application/atom+xml" href="http://... "/>


Mashup Architecture

Architecture:
image

Adapter:

image

TODO:
Integrate authentication architecture.

Thursday, April 10, 2008

Add image support in web2.0 app

I added image support in the web2.0 app. It means that users can uploads image files besides regular text files. Users can attach tags, description and name when uploading an image. Other users can post comment/rating about the image.

When an image is uploaded, it will be stored somewhere at server side. Moreover, it can be retrieved by accessing a URL. In other words, the server generates a URL which can be used to access that image. When a user tries to retrieve the image, it will be displayed in browser by using img elment.

Currently, I am using suffix of file name to judge type of record (image or text). The advantage is that user intervening is not needed. Drawback is that sometimes suffixes are not accurate. It may be better to use MIME type which is specified when user uploads an object.

Tomcat virtual/physical path mapping

In my web2.0 application, users can upload files to server. I want to build mapping from virtual path to physical path. It means that the resources accessed are located in a separate directory instead of tomcat sub directory.

Context container can be used to achieve that goal. Official document is here http://tomcat.apache.org/tomcat-6.0-doc/config/context.html.
In my case, I modified configuration file server.xml and insert following text into Host element:

<context crosscontext="true" docbase="E:\\temp\imgService" path="/imgService"></context>

Actually, at first, I tried to modify context.xml instead of service.xml because it is less invasive. However, it didn't work and I don't know why.

A Simple Web 2.0 Framework

I have completed a simple application which supports common web 2.0 features: rating, commenting, tagging.
Demo address is: http://156.56.104.196:8080/tagService/index_ui.html.

The basic unit in my system is called record. A record is abstraction of an object. Theoretically, it can be of any type: image, text, presentation... However, the key issue is how to present different types of records to end users. Text is easy to present and it can be displayed to users directly. For image, img element can be used but it requires that the image be stored somewhere on the website so that it can be accessed by visiting a URL. Currently, only text is supported. When a user retrieves some record, text content of that record is displayed directly in browser.

Operations:
(1) Add a new record
Users add a new record by uploading a file to server and specifying name, description and tags. Then a unique id is generated for this new record at server side.
(2) List all records
Get all records in the system.
(3) Get a record based on its id
According to record id, get corresponding id.
(4) Get records according to tag
According to user-specified tag, corresponding records are returned. Currently, users can only specify a single tag.
(5) Post comment and rating of a certain record
Users can post comments and ratings about records.
(6) Comment and rating of comment.
Besides comments of records, comments of comments are supported. It means that users can post comments about existing comments besides records.

Architecture:
web20_arch_ws 
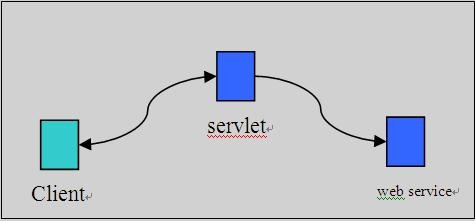
Client sends request to a server which uses servlet to handles it. Then the servlet accesses a web service which provides web 2.0 functionalities.

Presentation location:
What is stored in backend database is raw data. And it does not contain information about how to present it to end users. E.g. layout, font-size...
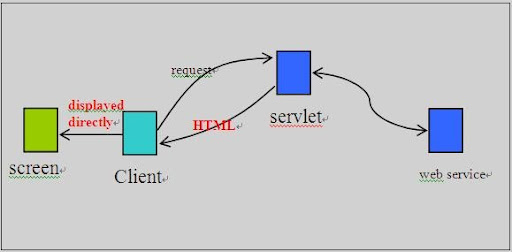
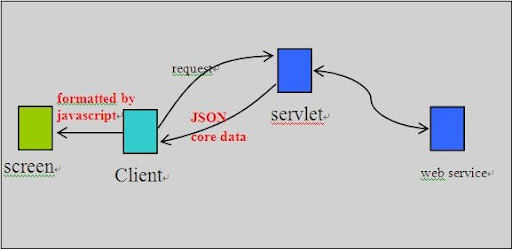
There are two strategies to transform raw data into final presentation data: server-side servlet and client-side javascript.
(1) Server-side servlet

web20_arch_html_ws
When servlet responds to user's request, a HTML document is returned. The HTML document does not only contains data but also contains presentation information. So it can be displayed directly. In this method, servlet formats the raw data received from web service into a corresponding HTML document.

(2) Client-side javascript

web20_arch_json_ws 
In this method, servlet just returns raw data in JSON format. It means returned data does not contain any presentation information. And client side javascript displays the raw data in a specific manner. Actually, to use this method, AJAX should be used. Object XmlHttpRrequest can be used to make asynchronous request without refreshing whole page.

Personally, I prefer the second method.
I remember there are some server-side Java libraries which can be used to make transformation execute with ease.

AJAX
    AJAX is used frequently. However, the format of request is not XML. I manually compose POST query in Javascript and then send it by using XmlHttpRequest. Actually, I use application/x-www-form-urlencoded which is the default data encoding of form submission. I chose this encoding because it is simple compared to the other encoding - multipart/form-data. To make it work well, the data must be escaped.
    Responses from server are in JSON format. So javascript decodes JSON string and dynamically modifies web page accordingly.
    An alternative method is to use XML-RPC.

Possible future work:
(1) User management
Currently, the system is open and everyone can use it anonymously.
(2) RESTful access
(3) Support image type in presentation layer.
(4) Persistence of server data.