Showing posts with label web service. Show all posts

Thursday, July 17, 2008

Google Calendar Demo Gadgets

I have implemented some calendar gadgets based on existing legacy gadgets.

(1) Google calendar viewer gadget
This app does not use Google Calendar Javascript API. Google Calendar generates automatically feeds for public events owned by a user. Address of the feed is http://www.google.com/calendar/feeds/username@gmail.com/public/full. This gadget retrieves public events of a specific calendar user and display them accordingly. Not all events are retrieved and displayed.
Assume today is A, then events that fall into period (A-30days) to (A + 60days) are handled.
Note: this gadget can just get public events.
I deployed it in both Orkut sandbox and Ringside.  Following screenshots are taken from Orkut.

Main page:
image

Description of various parts of the page:
image

When a user clicks the brief information of an event, detailed information will be displayed in place.
 image

(2) Standalone Google calendar client application.
This app does not rely on Gadget API or Open Social API. It just relies on Google Calendar Javascript library. So it can be run independently without gadget container. I deployed it on Ringside using IFrame.
It can be accessed by visiting http://gf1.ucs.indiana.edu:8080/gcalendar/calendar2.htm or you can use it in Ringside.

If a user has not logged in Google account, he/she will see a "Login" button.
image

After user clicks the "Login" button, he/she will be redirected to Google login page. After he/she logs in Google, he/she will be redirected to a "Access Request Authorization" page. Then the user can choose to grant or deny the access. It is shown below:
image

After the user grants access, following initial page will be displayed:
image

Description of every part in the page:
image 

When a user clicks the time range selection text box, a data picker will be displayed so that the user can easily select time period. It is shown below:
image

When a user selects his/her time range and clicks "Go" button, information of events within the specific time perios will be retrieved. And when the user clicks the drop-down box with label "Select...", a list of events will be displayed. See below screenshot:
 image

When the user selects an event, detailed information will be displayed in corresponding fields.
image

The user can modify information of an event and save it back in Google Calendar by clicking button "Save to Google Calendar".
image

(3) Google calendar gadget which allowes users to log in
This gadget is different from the first gadget mentioned above because this gadget allowes users to log in so that all events(public and private) can be retrieved and displayed. This gadget is based on the app(2) which is described above. The user interface is the same as that of app(2).
I deployed it on Ringside and Orkut sandbox successfully.

Wednesday, July 02, 2008

Ringside application development

Table of Content

Ringside Social Application Server seems a promising project. However, because it is still in beta development, online documents are not well organized. A better directory layout may help a lot. After reading the documents and trying Ringside server myself, I got some experience which is shared in this post.

What Ringside server can do?

(1) Open Social container.
It means all open social applications can be run on Ringside server. Of course, the open social applications should not use extensions provided a specific container( e.g. iGoogle, Orkut ) if you want these apps to run on Ringside server.
Note: Gadgets in Google content directory(repository of traditional gadgets) can not be used on Ringside server because traditional Gadget API is different from new Gadget spec used by Open Social API.
(2) Facebook platform mock
It supports FBML and Facebook API and adds some extensions, which means you can use the same function names and markups of Facebook to write your Ringside apps.
(3) Extensibility
Because Ringside server is open source, users can customize and extend Ringside server in the way they wish. For example, users can add their new APIs and extend XML tags to provide customized tags.

How to add and set up a new app?

Add a new app:
First click "Developer" tab, and in the main panel click "Create a New Application", following picture should be displayed:
image
When you create a new application in Ringside, the procedure is well similar to that of Facebook. The configuration options are almost the same as well. Look at below picture:
image 
One big difference is highlighted in the picture. In Facebook, you can just choose your app type between "Use FBML" and "Use IFrame". However, in Ringside server, one more option("Use Open Social") is supported. The key thing you should configure is "Callback URL" which points to the location of your application. For option "Canvas URL", you just need to specify a unique name and you must not specify the full-path URL. Prefix is implicit which is http://ringside_server_domain:port/canvas.php/. So if you specify "myapp" as your "Canvas URL", the URL to access your app becomes http://ringside_server_domain:port/canvas.php/myapp.
Note!!! When you set "Callback URL", you had better not use loopback domain or ip(e.g. localhost, 127.0.0.1) as host. If type of your app is "Use FBML", it may work well. In this mode, the output content is fully contained in the response. However, if type of your app is "Use IFrame", your app may not work. In this mode, a frame element is embedded in returned html and src attribute is set to point to the "Callback URL". As a result, the browser will send requests to its local host (the host a user is using to try your app) instead of the server which hosts your app. After you deploy and publish the app, using loopback address will definitely cause problems. To make your app work both in FBML mode and IFrame mode, loopback address should not be used!!!

Develop your own Ringside applications in PHP

See instructions here. After you get PHP library, generally you need to modify your php.ini and append path of the library to variable include_path so that PHP interpreter knows where to look for Ringside PHP library.
You applications do not need to be hosted on the same host as Ringside server. Ringside provides a PHP client library which can be used to ease PHP development. Ringside PHP client library is based on Facebook PHP client library. But Ringside wraps the code in original Facebook PHP client library. In original Facebook PHP client library, the rest server which you send requests to is hard-coded in the source code as "http://www.facebook.com". There is a class in Ringside library called "RingsideApiClients" which is a subclass of class "Facebook" and overwrites most of the inherited functions. Besides, Ringside adds some extra APIs which are mainly contained in class "RingsideApiClientsRest"(It is a subclass of class "FacebookRestClient").
So, you should use class "RingsideApiClients" to send requests to backend Ringside server. One thing your must do is configure the Ringside server URL so that your app knows where requests should be sent. There are two ways that I know:
(1) When you create an instance of RingsideApiClients, you can send weburl, serverurl and socialurl as parameters of contructor.
Prototype of the constructor is :
public function __construct($api_key, $secret, $webUrl = null, $serverUrl = null, $socialUrl = null, $client = null ).
(2) Change static variable in class RingsideApiClientsConfig.
Sample usage:
RingsideApiClientsConfig::$webUrl= ringside_web_url;
RingsideApiClientsConfig::$serverUrl = ringside_server_url;
RingsideApiClientsConfig::$socialUrl = ringside_social_url;

Extend API provided by Ringside Server

Good resource (1), (2).

Add your own tags to Ringside server

Good resources (1), (2).

Thursday, June 19, 2008

Web2.0 Integration Summary

The server-side architecture is described here:
http://zhenhua-guo.blogspot.com/2008/05/mashup-architecture.html.

Authentication: OpenID which is described here (http://zhenhua-guo.blogspot.com/2008/05/openid.html).
Authorization: Although OAuth seems promising, it has not been supported by large web 2.0 applications. So, I make use of various authorization mechanisms of different applications.

RESTful web services are used instead of SOAP-based web services. URL pattern used to access various resources is described here(http://zhenhua-guo.blogspot.com/2008/05/url-pattern-in-mashup.html).

At client side, Ajax is used to enhance user experience. Client side functionality is described here(http://zhenhua-guo.blogspot.com/2008/06/client-side-techniques.html).

Thursday, April 10, 2008

Add image support in web2.0 app

I added image support in the web2.0 app. It means that users can uploads image files besides regular text files. Users can attach tags, description and name when uploading an image. Other users can post comment/rating about the image.

When an image is uploaded, it will be stored somewhere at server side. Moreover, it can be retrieved by accessing a URL. In other words, the server generates a URL which can be used to access that image. When a user tries to retrieve the image, it will be displayed in browser by using img elment.

Currently, I am using suffix of file name to judge type of record (image or text). The advantage is that user intervening is not needed. Drawback is that sometimes suffixes are not accurate. It may be better to use MIME type which is specified when user uploads an object.

A Simple Web 2.0 Framework

I have completed a simple application which supports common web 2.0 features: rating, commenting, tagging.
Demo address is: http://156.56.104.196:8080/tagService/index_ui.html.

The basic unit in my system is called record. A record is abstraction of an object. Theoretically, it can be of any type: image, text, presentation... However, the key issue is how to present different types of records to end users. Text is easy to present and it can be displayed to users directly. For image, img element can be used but it requires that the image be stored somewhere on the website so that it can be accessed by visiting a URL. Currently, only text is supported. When a user retrieves some record, text content of that record is displayed directly in browser.

Operations:
(1) Add a new record
Users add a new record by uploading a file to server and specifying name, description and tags. Then a unique id is generated for this new record at server side.
(2) List all records
Get all records in the system.
(3) Get a record based on its id
According to record id, get corresponding id.
(4) Get records according to tag
According to user-specified tag, corresponding records are returned. Currently, users can only specify a single tag.
(5) Post comment and rating of a certain record
Users can post comments and ratings about records.
(6) Comment and rating of comment.
Besides comments of records, comments of comments are supported. It means that users can post comments about existing comments besides records.

Architecture:
web20_arch_ws 
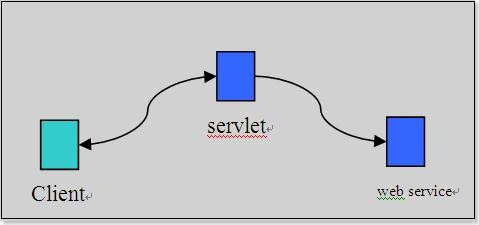
Client sends request to a server which uses servlet to handles it. Then the servlet accesses a web service which provides web 2.0 functionalities.

Presentation location:
What is stored in backend database is raw data. And it does not contain information about how to present it to end users. E.g. layout, font-size...
There are two strategies to transform raw data into final presentation data: server-side servlet and client-side javascript.
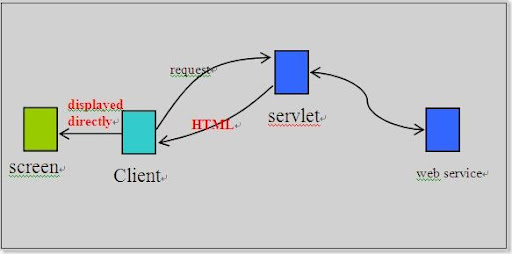
(1) Server-side servlet

web20_arch_html_ws
When servlet responds to user's request, a HTML document is returned. The HTML document does not only contains data but also contains presentation information. So it can be displayed directly. In this method, servlet formats the raw data received from web service into a corresponding HTML document.

(2) Client-side javascript

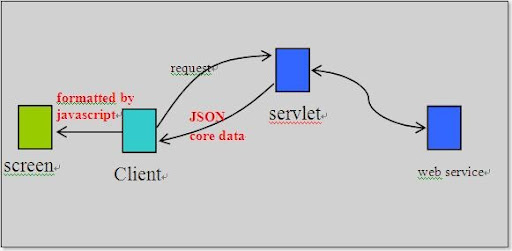
web20_arch_json_ws 
In this method, servlet just returns raw data in JSON format. It means returned data does not contain any presentation information. And client side javascript displays the raw data in a specific manner. Actually, to use this method, AJAX should be used. Object XmlHttpRrequest can be used to make asynchronous request without refreshing whole page.

Personally, I prefer the second method.
I remember there are some server-side Java libraries which can be used to make transformation execute with ease.

AJAX
    AJAX is used frequently. However, the format of request is not XML. I manually compose POST query in Javascript and then send it by using XmlHttpRequest. Actually, I use application/x-www-form-urlencoded which is the default data encoding of form submission. I chose this encoding because it is simple compared to the other encoding - multipart/form-data. To make it work well, the data must be escaped.
    Responses from server are in JSON format. So javascript decodes JSON string and dynamically modifies web page accordingly.
    An alternative method is to use XML-RPC.

Possible future work:
(1) User management
Currently, the system is open and everyone can use it anonymously.
(2) RESTful access
(3) Support image type in presentation layer.
(4) Persistence of server data.

Thursday, March 27, 2008

Workaround of bug in integration of db4o and axis2

I have been trying to solve the problem described in my last post.

I tried different versions of tomcat and Db4o which did not help me out. I posted this problem in forum of Db4o to ask for help. However, no one supplied right solution. I tried countless possible solutions. Finally, I got it to work. Following is the procedure how I discovered my solution.

To enhance speed of development , I tried to find some software support. I have been using Eclipse as my IDE. So naturally WTP(Web Tool Platform) is a great plug-in to support development of web applications in Eclipse. WTP provides support for Tomcat and Axis2 which are being used in my project. Here(http://www.eclipsecon.com/webtools/community/tutorials/BottomUpAxis2WebService/bu_tutorial.html) is a great tutorial about how to deploy and start Axis2 web service in Eclipse.

Then I doubt that the problem maybe results from Axis2. So I decided to write a simple servlet to do similar job. In other words, Axis2 was not used. And test result showed that everything worked correctly with Db4o. So this meaned that it is highly possible that Axis2 is cause of the problem. I did further investigation to uncover what is wrong under the hood. I built the same Axis2 service in Eclipse and deployed the service to Eclipse's temporary publish directory. Surprisingly, it worked!!! However, if I built web service using ADB(Apache Databinding) in Axis2, wrapped it to a .aar archive file and deployed it into specific directory (services), it did not work!!! So, I made sure that the procedure of deployment of Axis2 web service in Eclipse MUST be different from what I did before. Finally, I found that Eclipse does not wrap web service implementation into a .aar archive file. Instead the deployment directory layout is:

axis2
    - WEB-INF
        - lib
        - conf
        - services
            - Sample                        //Sample is the name of this web service
                - META-INF
                    - services.xml       //this file describes the information of this web service.
        - classes
            - package                     //this is path corresponding to package
                - *.class                    //These .class files are implementation of web service.
    - META-INF
    - axis2-web

The original layout is:
axis2
    - WEB-INF
        - lib
        - conf
        - services
            - Sample.aar               //the .aar archive file
        -classes
    - META-INF
    - axis2-web

Difference is highlighted in blue.
The services.xml is also different. The new services.xml is:

<service name="Sample" >
    <description>
        Please Type your service description here
    </description>
    <messageReceivers>
        <messageReceiver mep="http://www.w3.org/2004/08/wsdl/in-only" class="org.apache.axis2.rpc.receivers.RPCInOnlyMessageReceiver" />
        <messageReceiver  mep="http://www.w3.org/2004/08/wsdl/in-out"  class="org.apache.axis2.rpc.receivers.RPCMessageReceiver"/>
    </messageReceivers>
    <parameter name="ServiceClass" locked="false">package.Sample</parameter>
</service>

Besides, in my previous using of Axis2, I used tool provided by Axis2 to construct automatically a stub class and some other auxiliary classes of client side. Then I added my implementation code to that stub class (this stub class contains Axis2-specific stuff). In this new deployment, I did not rely on any Axis2-specific functionality. I just wrote my implementation and compiled it into .class files. And then copied these .class files to directory ${TOMCAT_ROOT}/axis2/classes/package-path/. In addition, I needed to manually create and edit corresponding services.xml file. In my previous deployment, this file is generated automatically by Axis2 tool.
To sum up, this new deployment method eases development of web service because no Axis2-specific stuff is involved during development. The drawback is it is not compact considering that those files are scattered in different places. With regard to this deployment, I did not find much useful information on web. Maybe this method is not recommended, who knows...

However, I have no choice because only one of them works well.

Friday, February 15, 2008

RESTful web services in Java

Recently, I read some articles about RESTful web services and I am looking for some java libraries which have great support for REST. REST is supported by Axis2. However, the support is very limited. First, document(http://ws.apache.org/axis2/1_3/rest-ws.html) of REST support in the official web site is horrible. The content is very very brief so that I have more questions and confusions than what have been addressed by that document. Support for REST in Axis2 relies on a new feature in WSDL2 which enables HTTP binding. Here is a good article about it:http://www.ibm.com/developerworks/webservices/library/ws-rest1/. However, HTTP binding doesn't enable programmers to implement a full REST style system. I did not dig into WSDL2 to get more knowledge about its HTTP binding. Here(http://wso2.org/blog/footballsoccerpainting/949) is an article from someone else who complains Axis2.
Then, I found that JCP published a Java API specification about RESTful web services. It is JSR-311(http://jcp.org/en/jsr/detail?id=311). That looks pretty good because now we have a standard about how to use REST in Java. Jersey(https://jersey.dev.java.net/) is reference implementation of the specification. Besides Jersey, Restlet(http://www.restlet.org/) is another implementation which provides more features. Note that the specification itself is still in beta phase.

I decided to try Jersey. First download and unpack it.
Sample code:

@Path("/")
public class RESTTest{
    @HttpContext UriInfo uriInfo;	
    
    @GET
    @ProduceMime("text/plain")
    public String getUserAll(){
    	return "You want to retrieve information about all users.";
    }
    
    @Path("{user}")
    public UserResource getUserInfoAsText(@UriParam("user") String userid){
    	return new UserResource(userid);
    }
}
Most readers have noticed that Java annotation is used frequently. I think this method is handy and convenient.

Friday, December 28, 2007

State server event arrivial order

State service has been implemented before. Detailed information is here: http://zhenhua-guo.blogspot.com/2007/12/state-service-implementation-zhenhua.html. However, there are several unsolved problems. Recently, I fixed one of them.
A typical procedure is:
(1) End user sends a workflow to agent server.
(2) Agent server transforms the original workflow into an internal format.
(3) Agent server sends the workflow to status server.
(4) Agent server submits the workflow to executor.
(5) Executor sends event messages to status server to report the progress of execution of the workflow.
The following senario is possible:
    When status server receives event messages from executor, it has not received the workflow from agent server. In other words, although workflow is sent by agent server before event messages are sent by executor, the arrivial order at the status server is not guaranteed.
In this case, the event messages will be lost and we have no chance to restore it.
[Solution]
Message buffer.
If the senario above happens, the received messages are buffered/saved temporarily at status server. Then, when a workflow is received by status server, all buffered/saved messages corresponding to that workflow will be applied to it.
[For example]
(1) Executor sends following message to status server.
    user "tony"                                    //user who owns the workflow
    workflow "weatherforecast"           //workflow id which uniquely identifies the workflow
    subjob: "solve equations"                //sub job
    status: started                               
//status
(2) Status server receives that message.
    However, by checking its repository, status server finds that the corresponding workflow has not been received yet.
    So, that message is buffered.
(3) Status server receives the following workflow message from agent server.
    user "tony"
    workflow "weatherforecast"
    workflow content "<project>....</project>"
(4) Apply the message to the workflow and status of the workflow is changed to indicate that some element starts to execute.

Wednesday, October 31, 2007

Install JDK, Tomcat and Axis2 on Ubuntu

Previously, I deployed all java related stuff on my windows machine. Now, I would like to deploy on linux.
My environment:
Operating System: Ubuntu 6.06.1 LTS f
JDK 6 installation
In Ubuntu, an open source Java environment has been included. It is Gcj(http://gcc.gnu.org/java/). It is a GNU project. However, I prefer Sun JDK.
(1) download and install Sun JDK 1.6
Ubuntu is a branch of Debian, so it naturally inherits the great package management tool -- apt-get. It is an easy job to install packages on Ubuntu.
First, you should add "universe" and "multiverse" repositories to your /etc/apt/sources.list file. Then, execute following command:
   sudo apt-get install sun-java6-jdkBy default, it will be installed to /usr/lib/jvm/.
(2) configure it
Because now we have two Java compilers/interpreters installed, to make it work in the way I expect configuration is a must. In directory /usr/lib/jvm/, there are several *.jinfo files which contains information about installed jdk/jre packages. You can change jdk/jre alternatives by using command:update-java-alternatives.   
   sudo update-java-alternatives -l
  //list all available jre/jdk installations
   sudo update-java-alternatives -s java-6-sun  //set sun's jdk to be used
Or, you can use:
   sudo update-alternatives --config java
Then a list of available jdk/jre installations is displayed. In my case, it is:
There are 3 alternatives which provide `java'.

  Selection    Alternative
-----------------------------------------------
          1    /usr/bin/gij-wrapper-4.1
 +        2    /usr/lib/jvm/java-gcj/jre/bin/java
*         3    /usr/lib/jvm/java-6-sun/jre/bin/java

Press enter to keep the default[*], or type selection number: 
Then, set environment vaiable. Add following two lines:  
   JAVA_HOME="/usr/lib/jvm/java-6-sun"
to file /etc/environment.
(3) test
Type:
javac -version
java -version
to see whether your configuration works.
Install Tomcat 5.5
(1) Download and install
sudo apt-get install tomcat5.5 tomcat5.5-admin tomcat5.5-webapps
Note: here I installed three packages. Tomcat 5.5 contains basic implementation of Servlet and JSP specifications. Tomcat 5.5-admin contains two web-based management interface. Tomcat 5.5-webapps contains documents and some sample web applications.
(2)Configure
I installed webapps and admin.
Set CATALINA_HOME environmen variable. In my case, CATALINA_HOME=/usr/share/tomcat5.5.
The example apps are installed to "/usr/share/tomcat5.5/webapps/".
Global configuration files (server.xml and web.xml) are located in "/etc/tomcat5.5".
To make use of the web-based management tool, you need an account. You can set up your account by modifying file /usr/share/tomcat5.5/conf/tomcat-users.xml. Add the following line:
   <user username="username"  password="password" roles="manager,admin" />
Then, restart tomcat
   sudo /etc/init.d/tomcat5.5 restart
Note: "admin" and "manger" are two different roles.
(3)Start/Stop server
Script used to start/stop tomcat server is /etc/init.d/tomcat5.5.
sudo /etc/init.d/tomcat5.5 start
sudo /etc/init.d/tomcat5.5 stop
sudo /etc/init.d/tomcat5.5 restart
sudo /etc/init.d/tomcat5.5 force-reload
sudo /etc/init.d/tomcat5.5 status
However, you had better use script in directory /usr/share/tomcat5.5/bin/. I guess /etc/init.d/tomcat5.5 is intended to be used internally.
      /usr/shar/share/tomcat5.5/bin/startup.sh
      /usr/shar/share/tomcat5.5/bin/shutdown.sh
(4)Test
Tomcat by default listens to port 8180. In windows, it listens to 8080. Strange...
You can visit http://localhost:8180 to check whether your installation succeeds.
(5) Deploy your own web app
Your application should be put into directory "/usr/share/tomcat5.5/webapps/". You can use a .war file or just regular file system tree.

Problem:

   After installing Tomcat 5.5, I typed http://localhost:8180 to do test. Everything seemed to work well -- management, administration ... However, when I tried the JSP example at http://156.56.104.196:8180/jsp-examples/, error occurred!
Error message is:

HTTP Status 500 -


type Exception

type Exception report

message

description The server encountered an internal error () that prevented it from fulfilling this request.

exception

org.apache.jasper.JasperException: Unable to load class for JSP
 org.apache.jasper.JspCompilationContext.load(JspCompilationContext.java:598)
 org.apache.jasper.servlet.JspServletWrapper.getServlet(JspServletWrapper.java:147)
 org.apache.jasper.servlet.JspServletWrapper.service(JspServletWrapper.java:315)
 org.apache.jasper.servlet.JspServlet.serviceJspFile(JspServlet.java:314)
 org.apache.jasper.servlet.JspServlet.service(JspServlet.java:264)
 javax.servlet.http.HttpServlet.service(HttpServlet.java:802)

root cause
......

I made sure that all related .jar files were positioned correctly. What was weird was that servlet example could run correctly while JSP example always incurred error. I wrote a simple JSP file:
   <% out.println("Hello,world"); %>
After deploying it, I found that it worked!!!

Solution
After search by Google, finally I found this page http://forum.java.sun.com/thread.jspa?threadID=693082&messageID=4028997 which gave solution. The reason is incorrect configuration in Tomcat 5.5 distribution!!! I repeat the solution simply here:
Edit /usr/share/tomcat5.5/webapps/jsp-example/WEB-INF/tagPlugins.xml.
Original one is:

<tag-plugins>
  <tag-plugin>
    <tag-class>org.apache.taglibs.standard.tag.rt.core.IfTag</tag-class>
    <plugin-class>org.apache.jasper.tagplugins.jstl.If</plugin-class>
  </tag-plugin>
  <tag-plugin>
    <tag-class>org.apache.taglibs.standard.tag.common.core.ChooseTag</tag-class>
    <plugin-class>org.apache.jasper.tagplugins.jstl.Choose</plugin-class>
  </tag-plugin>
  <tag-plugin>
    <tag-class>org.apache.taglibs.standard.tag.rt.core.WhenTag</tag-class>
    <plugin-class>org.apache.jasper.tagplugins.jstl.When</plugin-class>
  </tag-plugin>
  <tag-plugin>
    <tag-class>org.apache.taglibs.standard.tag.common.core.OtherwiseTag</tag-class>
    <plugin-class>org.apache.jasper.tagplugins.jstl.Otherwise</plugin-class>
  </tag-plugin>
  <tag-plugin>
    <tag-class>org.apache.taglibs.standard.tag.rt.core.ForEachTag</tag-class>
    <plugin-class>org.apache.jasper.tagplugins.jstl.ForEach</plugin-class>
  </tag-plugin>
</tag-plugins>
Note, those orange lines are not correct!! Altered copy is:
<tag-plugins>
  <tag-plugin>
    <tag-class>org.apache.taglibs.standard.tag.rt.core.IfTag</tag-class>
    <plugin-class>org.apache.jasper.tagplugins.jstl.core.If</plugin-class>
  </tag-plugin>
  <tag-plugin>
    <tag-class>org.apache.taglibs.standard.tag.common.core.ChooseTag</tag-class>
    <plugin-class>org.apache.jasper.tagplugins.jstl.core.Choose</plugin-class>
  </tag-plugin>
  <tag-plugin>
    <tag-class>org.apache.taglibs.standard.tag.rt.core.WhenTag</tag-class>
    <plugin-class>org.apache.jasper.tagplugins.jstl.core.When</plugin-class>
  </tag-plugin>
  <tag-plugin>
    <tag-class>org.apache.taglibs.standard.tag.common.core.OtherwiseTag</tag-class>
    <plugin-class>org.apache.jasper.tagplugins.jstl.core.Otherwise</plugin-class>
  </tag-plugin>
  <tag-plugin>
    <tag-class>org.apache.taglibs.standard.tag.rt.core.ForEachTag</tag-class>
    <plugin-class>org.apache.jasper.tagplugins.jstl.core.ForEach</plugin-class>
  </tag-plugin>
</tag-plugins>
Install Axis2 1.3 in Tomcat 5.5
(1) Download Axis2 1.3 Release
I chose to download .war file which would be deployed in tomcat 5.5
Command:
   wget http://www.eng.lsu.edu/mirrors/apache/ws/axis2/1_3/axis2-1.3-war.zip
(2) Deploy axis2.
Copy the downloaded axis2.war to /usr/share/tomcat5.5/webapps/. Then restart Tomcat. Tomcat automatically extracts and deploys the .war file.
(3) Test
Go to http://localhost:8180/axis2/. You should see the welcome page of Axis2.
Axis2 provides a user-friendly web-based interface to view all available services, validate the installation, upload new service (actually what are uploaded are .aar files)...
Standard binary distribution of Axis2 1.3
In fact, if you want to develop web service by using Axis2, you should download standard binary distribution which contains complete version of Axis2.
The most important part of Axis2 are those tools under directory bin. These tools include axis2.sh/axis2.bat, axis2server.bat/axis2server.sh, java2wsdl.bat/java2wsdl.sh, wsdl2java.sh/wsdl2.bat.  I described usage of these tools in my last post.

Tuesday, October 30, 2007

Web Service Development and Deployment using Axis2

Goal
Develop and deploy web service in Apache Tomcat by using Axis2 1.2/1.3.
Prerequisite:
(1) Install JDK, Tomcat and Axis2.
      Keys:
         (a) Versions of these packages must match.
         (b) JDK is recommended. Though JRE works most of the time, some features of the additional libraries/packages may not work well.
(2) Configure JDK. I think the most important part is to set the environment.
     There are already lots of tutorials around the internet. Typically, you should set environment variables : JAVA_HOME and CLASSPATH.
(3) Configure Tomcat
     Tomcat must be run on JVM. So path of JVM needs to be configured correctly.
(4) Deploy Axis2
     Axis2 is deployed in Tomcat. You can put the axis2.war file to webapps directory of Tomcat. Tomcat automatically unextracts and deploys it.
     In addition, you should set AXIS2_HOME environment variable to point to the location of axis2.
Procedure
Now, let's start to write our service prototype.
(1) Define interface in Java.
My sample interface:
File Add.java
package test;
interface Add{
   int addoperation( int op1, int op2 ) ;
}
(2) Now, compile Add.java to .class file. Command:
     javac Add.java
(3) Then, we will generate WSDL document based on the interface defined above.
     The tool is Java2WSDL which is included in Axis2 package.  My command used to generate WSDL document is:
          Java2WSDL -cn test.Add
     The newly generated WSDL document is Add.wsdl.
     Note: (1) Java2WSDL generates WSDL document based on .class file, not .java source file. So step (2) is necessary.
              (2) Java2WSDL command must be invoked in right directory. You must obey that package name must match
                   the directory hierarchy. In my case,directory tree is: D:/apps/demo/test/Add.java. When I invoke Java2WSDL,
                   current working directory is D:/apps/demo/.
(4) Use WSDL2Java (included in Axis2 package) to generate stub Java functions based on WSDL document.
There are two parts: client side and server side.
Detailed information about WSDL2Java/Java2WSDL is here: http://ws.apache.org/axis/java/user-guide.html#UsingWSDLWithAxis
(4.1) Server side
First you need to copy the generated Add.wsdl to the machine where service is to be located. In my case, the Add.wsdl is stored at D:/apps/demo/service.
(4.1.1) Generate stub functions
Again, WSDL2Java is used. Command is:    WSDL2Java -uri C:/apps/demo/test/Add.wsdl -p test -d adb -s -ss -sd -ssi
After excution of this command, directory tree looks like:
D:/apps/demo/service/
   Add.wsdl 
   resource
      Add.wsdl
      services.xml
   src
      test
         AddMessageReceiverInOut.java
         Addoperation.java
         AddoperationResponse.java
         AddSkeleton.java
         AddSkeletonInterface.java
         ExtensionMapper.java
   build.xml
(4.1.2) Add functionality of your service to generated methods
File AddSkeleton.java contains code directly related to your web service implementation. Initial content of AddSkeleton.java is:
/**
 * AddSkeleton.java
 *
 * This file was auto-generated from WSDL
 * by the Apache Axis2 version: 1.3  Built on : Aug 10, 2007 (04:45:47 LKT)
 */
package test;

/**
 *  AddSkeleton java skeleton for the axisService
 */
public class AddSkeleton implements AddSkeletonInterface {
    /**
     * Auto generated method signature
     * @param addoperation0
     */
    public test.AddoperationResponse addoperation(
        test.Addoperation addoperation0) {
        //TODO : fill this with the necessary business logic
        throw new java.lang.UnsupportedOperationException("Please implement " +
            this.getClass().getName() + "#addoperation");
    }
}

I modify AddSkeleton.java to add my web service implementation. New content is:
package test;

public class AddSkeleton implements AddSkeletonInterface {
    public test.AddoperationResponse addoperation(
        test.Addoperation addoperation0) {
         //first, get two parameters
         int op1 = addoperation0.getParam0();
         int op2 = addoperation0.getParam1();
         int sum = op1 + op2; //calculate summation
         AddoperationResponse resp = new AddoperationResponse();//construct response object
         resp.set_return( sum );//set the return value
         return resp;
    }
}
(4.1.3) Build a service
Change directory to D:/apps/demo/service/, then execute the following command:
ant jar.server
After execution, directory tree looks like:
D:/apps/demo/service/
   Add.wsdl 
   resource
      Add.wsdl
      services.xml
   src
      test
         AddMessageReceiverInOut.java
         Addoperation.java
         AddoperationResponse.java
         AddSkeleton.java
         AddSkeletonInterface.java
         ExtensionMapper.java
   build.xml
   build
      classes
         META-INF
            Add.wsdl
            services.xml
         test
            some .class files
      lib
         Add.aar
Note: Add.aar is the the archive.
(4.1.4) Deploy the service
Copy Add.arr to the "services" directory (Tomcat_directory/webapps/axis2/WEB-INF/services) of deployed axis2. Axis2 provides a web-based interface to manage the deployed services. You can use that interface to upload your .arr file.
(4.2) Client side
(4.2.1) Generate stub functions
My command used to generate client-side Web service stub functions is:
    WSDL2Java -uri Add.wsdl -p test.axis2.add -d adb -s
After execution of this command, directory tree should look like:
D:/apps/demo/ 
   Add.wsdl 
   test
      Add.java 
      Add.class
   src
      test
         AddStub.java
   build.xml
The file AddStub.java contains the newly generated client-side stub functions.
(4.2.2) develop your code to use web service
(4.2.2.1) Write source code to invoke remote web service
Create a new file called Client.java (Actually, you can use any name you like) in the directory D:/apps/demo/src/test/.
Content of the file:
package test;

import java.io.*;
import test.AddStub.Addoperation;
import test.AddStub.AddoperationResponse;

public class Client {
 public static int op1 = 0;
 public static int op2 = 0;
    public static void main(java.lang.String[] args) {
        try {
            AddStub stub = new AddStub("http://localhost:8080/axis2/services/Add");
            BufferedReader   in=new   BufferedReader(new  InputStreamReader System.in));  
            System.out.println("Please input the first operand:");
            String input = in.readLine();
            op1 = Integer.parseInt( input );
            System.out.println("Please input the second operand:");
            input = in.readLine();
            op2 = Integer.parseInt( input );
            add(stub);
        } catch (Exception e) {
            e.printStackTrace();
            System.out.println("\n\n\n");
        }
    }

    /* invoke the 'add' web service */
    public static int add(AddStub stub) {
        try {
            Addoperation req = new Addoperation();
            req.setParam0(op1);
            req.setParam1(op2);
            AddoperationResponse resp = new AddoperationResponse();
            resp = stub.addoperation(req);//invoke the web service
            System.out.println("done");
            System.out.println(op1 + "+"+ op2 + " is " + resp.get_return());
            return resp.get_return();
        } catch (Exception e) {
            e.printStackTrace();
            System.out.println("\n\n\n");
        }
        return 0;
    }
}
Note: In axis2 1.4, the generated code is different from code generated by axis2 1.3.
In axis2 1.3, parameters of a request are set using setParam0, setParam1,...
In axis2 1.4, parameters of a request are set using setter functions of those properties, e.g. setName, setId.
Also the method to get return value is different. There may be some other changes I don't know, so I encourage to consult official Axis2 document.
(4.2.2.2) compile the source file and execute it.
Change your current working directory to: C:/apps/demo/, then execute following command:
    ant jar.client
Then, a new directory "build" is created. Now the directory looks like:
D:/apps/demo/ 
   Add.wsdl 
   test
      Add.java 
      Add.class
   src
      test
         AddStub.java
   build.xml
   build
      classes
         test
            some .class files
      lib
         Add-test-client.jar
Now, you can use java command to execute the program.
Remeber: first you must set CLASSPATH to include axis2 .jar libraries and newly created Add-test-client.jar. One alternative way is to use option -cp of command java. Command to execute your program is:
    java test.Client      #with CLASSPATH being set
or
  java -cp <axis2_jars>:./Add-test-client.jar test.Client      #without CLASSPATH being set
To relieve programmers from these fussy stuff, axis2 provides a tool axis2.bat/axis2.sh. This script automatically set CLASSPATH to include all the .jar files of axis2. How can the script know where your axis2 is installed? Ha, you must create a new environment variable called AXIS2_HOME which contains the path where axis2 is installed. However, the newly created Add-test-client.jar is not included in the classpath by the axis2.bat/axis2.sh script. So you still need to add it to CLASSPATH. Execute your program using command:
    axis2.sh -cp ./Add-test-client.jar test.Client
In fact, I wrote my own script to ease invocation of that program. Now, I don't need to set long CLASSPATH or input long command line with -cp option.