Showing posts with label Javascript. Show all posts

Friday, August 28, 2009

Dynamic-height in Shindig

Gadget specification provides a feature called dynamic-height to dynamically adjust height of a gadget.
If gadget server and gadget container are in the same domain, this can be done using javascript.
However, if gadget server and gadget container are in different domains, this can not be achieved by directly using Javascript and DOM because of same-origin policy imposed by modern browsers.
This email http://markmail.org/message/53r5dwhr56lby733#query:dynamic%20height%20shindig+page:1+mid:53r5dwhr56lby733+state:results includes some information about how to make it work.
I am going to give more details here.

Gadget container

  1. Download
        http://svn.apache.org/repos/asf/incubator/shindig/trunk/javascript/container/cookies.js
        http://svn.apache.org/repos/asf/incubator/shindig/trunk/javascript/container/gadgets.js
        http://svn.apache.org/repos/asf/incubator/shindig/trunk/javascript/container/util.js
        http://your_shindig_deploy/gadgets/js/rpc.js?c=1&debug=1 (//this file actually includes rpc framework and all possible communication mechanism, e.g. ifpc, wpm...)
    And put them into your gadget container server.
  2. Include following code in your container web page to make them point to those javascript files you downloaded in step 1).
    <script type="text/javascript" src="rpc.js"></script>
    <script type="text/javascript" src="cookies.js"></script>
    <script type="text/javascript" src="util.js"></script>
    <script type="text/javascript" src="gadgets.js"></script>
  3. Download
        rpc_relay.html : http://svn.apache.org/repos/asf/incubator/shindig/trunk/javascript/container/rpc_relay.html
    or
        rpc_relay_uncompressed.html: http://svn.apache.org/repos/asf/incubator/shindig/trunk/javascript/container/rpc_relay.uncompressed.html

Gadget server/renderer

  1. Check out Shindig source code. See http://incubator.apache.org/shindig/source-repository.html
  2. Change source code of file ifpc.transport.js
    Original:
    // The RPC mechanism supports two formats for IFPC (legacy and current). var src = null; if (rpc.l) {
    New
    // The RPC mechanism supports two formats for IFPC (legacy and current).
    var src = null;
    if (false) {
    This disables use of legacy data format which is buggy.
  3. Change configuration in file config/container.js
        Original: "parentRelayUrl" : "/gadgets/files/container/rpc_relay.html"
        New:       "parentRelayUrl" : "rpc_relay file address on your gadget container" //it is download in this step
    Also you may want to use ifpc instead of browser-specific communication mechanisms.
        Original: "useLegacyProtocol" : false    //gadget tries browser-specific communication mechanisms first. If they fail, fall back to ifpc.
        New:      "useLegacyProtocol" : true           //use ifpc directly.
    Note: the current wire format will be used instead of legacy format because we have disabled legacy format.
    This option is not used in the way described by comment in the source code. The shindig developers want users to use this option to control whether legacy format is used. I use it to configure whether ifpc is used. If ifpc is used, only current wire format is utilized.
    This can also be set after you deploy shindig. The configuration file is located at WEB-INF/classes/containers/default/.
  4. Rebuild shindig.
  5. Copy generated .war file in directory server/target to your servlet container.

Resources

Detailed discussion: http://docs.google.com/View?id=dmxthpg_125ckh55fff
Cross-Domain Communication with IFrames: http://softwareas.com/cross-domain-communication-with-iframes

Saturday, February 21, 2009

Manipulate IFrame in Javascript

Create a iframe and set the content directly:

var frame = document.createElement('iframe');
parentElement.appendChild(frame);
frame.contentDocument.write(result);
According to Dom level 2 HTML specification, contentDocument is a property of HTMLIFrameElement.

Following code may also work. However I have not found the contentWindow property in W3C DOM specification.

var frame = document.createElement('iframe');
parentElement.appendChild(frame);
frame.contentWindow.document.write(result);

Friday, October 10, 2008

Automatically adjust height of IFrame using Javascript

A simple and natural requirement, but unfortunately it may or may not work as you expect.
What matters here is security. If src of an iframe does not access external address, it works well. Otherwise, nothing will solve the problem except that the user lowers the security level. Javascript can not access information of an IFrame whose content is hosted by a third-party site.

Let us assume that src of an iframe does not point to an external resource, following code can be used:

var ele =document.getElementById(frameid); 
ele.style.height = ele.contentWindow.document.body.scrollHeight

You may wonder why document.frames[frame_name] is not used here. Anyway, I tried it on Firefox 3, it did not work. As you know, compatibility is a real pain for web developers.

One possible solution is to set up a proxy server which relays the requests/responses.

Thursday, July 17, 2008

Google Calendar Demo Gadgets

I have implemented some calendar gadgets based on existing legacy gadgets.

(1) Google calendar viewer gadget
This app does not use Google Calendar Javascript API. Google Calendar generates automatically feeds for public events owned by a user. Address of the feed is http://www.google.com/calendar/feeds/username@gmail.com/public/full. This gadget retrieves public events of a specific calendar user and display them accordingly. Not all events are retrieved and displayed.
Assume today is A, then events that fall into period (A-30days) to (A + 60days) are handled.
Note: this gadget can just get public events.
I deployed it in both Orkut sandbox and Ringside.  Following screenshots are taken from Orkut.

Main page:
image

Description of various parts of the page:
image

When a user clicks the brief information of an event, detailed information will be displayed in place.
 image

(2) Standalone Google calendar client application.
This app does not rely on Gadget API or Open Social API. It just relies on Google Calendar Javascript library. So it can be run independently without gadget container. I deployed it on Ringside using IFrame.
It can be accessed by visiting http://gf1.ucs.indiana.edu:8080/gcalendar/calendar2.htm or you can use it in Ringside.

If a user has not logged in Google account, he/she will see a "Login" button.
image

After user clicks the "Login" button, he/she will be redirected to Google login page. After he/she logs in Google, he/she will be redirected to a "Access Request Authorization" page. Then the user can choose to grant or deny the access. It is shown below:
image

After the user grants access, following initial page will be displayed:
image

Description of every part in the page:
image 

When a user clicks the time range selection text box, a data picker will be displayed so that the user can easily select time period. It is shown below:
image

When a user selects his/her time range and clicks "Go" button, information of events within the specific time perios will be retrieved. And when the user clicks the drop-down box with label "Select...", a list of events will be displayed. See below screenshot:
 image

When the user selects an event, detailed information will be displayed in corresponding fields.
image

The user can modify information of an event and save it back in Google Calendar by clicking button "Save to Google Calendar".
image

(3) Google calendar gadget which allowes users to log in
This gadget is different from the first gadget mentioned above because this gadget allowes users to log in so that all events(public and private) can be retrieved and displayed. This gadget is based on the app(2) which is described above. The user interface is the same as that of app(2).
I deployed it on Ringside and Orkut sandbox successfully.

Saturday, July 05, 2008

Google Gadget and OpenSocial

Opensocial API is an open set of APIs which can be used to access various social network applications. Currently, social network apps which support OpenSocial API are listed here.

Google Gadget:
Official specification of Gadget server/container is here(http://code.google.com/apis/gadgets/docs/spec.html). It includes abundant information about how gadget container handles gadget requests from clients. The basic idea is gadget container processes gadget .xml definition file and generates corresponding HTML+CSS+Javascript and then transferres the result to end users. Variety of functionalities gadget deveoper can utilize depends on gadget container. Different gadget containers may provide different set of features. However, some APIs are mandatory and must be supported by all compliant implementations. Javascript gadget specification is here(http://code.google.com/apis/gadgets/docs/reference/). Gadget XML reference is here(http://code.google.com/apis/gadgets/docs/reference.html). This site contains many useful hints about how to develop and test Google Gadgets.

There are two set of Gadget APIs:Legacy API and gadgets.* api(used by Open Social spec).

Gadget Host:
If you don't have a web server to host the gadget XML file, Google Gadgets Editor is a tool provided by Google which can be used to edit and host gadgets. You can test your gadgets in GGE withoug logging in Google. But you cannot save your gadgets without logging in. You can add Google Gadget Editor gadget to your iGoogle homepage by accessing this site. It seems that only legacy gadget APIs are supported in preview mode by GGE. GGE just provides very simple functionalities. You can use it just as a hosting service which stores your gadget spec files. If you want more functionalities like version control, you can use Google Code Hosting(http://code.google.com/hosting/) or other full-fledged hosting services.  This site contains detailed information about how to use Google hosting services.

Legacy Gadget Container:
Besides spec files, gadget container is necessary to run your gadgets. To test legacy Google Gadgets, you can GGE or iGoogle content directory. Here contains instructions about how to publish your gadgets to iGoogle content directory. You can update your submitted gadgets using this site. NOTE: iGoogle content directory only applies to legacy gadgets.

Open Social Gadget container:
To test new google gadgets(using gadgets.* API), you should use a certain container listed here. Note: two services from Google are in the list. However, to use them, you must sign up for sandbox access besides regular logging in. To sign up sandbox access of iGoogle, visit this site(http://www.google.com/ig/sandbox). To sign up sandbox access of Orkut, visit this site. These two services are still in beta phase and thus provide limited functionalities.

Resources:
iGoogle Dev: http://code.google.com/apis/igoogle/docs/igoogledevguide.html
Orkut Dev: http://code.google.com/apis/orkut/docs/orkutdevguide.html

Thursday, June 19, 2008

Client side techniques

Namespace mimic in Javascript (similar to technique used by YUI):
namespace:   function(   sNameSpace, obj   )   {  
    if   (!sNameSpace   ||   !sNameSpace.length)   {  
        return   null;  
    }  
    var   levels   =   sNameSpace.split(".");  
    var   currentNS   =   CGL;  
    //   CGL   is   implied,   so   it   is   ignored   if   it   is   included  
    for   (var   i=(levels[0]   ==   "CGL")   ?   1   :   0;   i<levels.length;   ++i)   { 
        if( arguments.length == 2 && i == levels.length - 1)
	    currentNS[levels[i]]   =   obj;
	else
	    currentNS[levels[i]]   =   currentNS[levels[i]]   ||   {};  
	currentNS   =   currentNS[levels[i]];  
    }
    return   currentNS;  
}
By default, following namespaces are supported:
CGL.mashup.resourcetype:
This object maintains resource types we support. Currently, text, image and video are supported.
CGL.mashup.addr:
This object maintains base path for our applications.
CGL.mashup.sites:
This object maintains all backend sites we support. Currently, Youtube and Flickr are supported.
CGL.mashup.log:
This object maintains request history so that in the future we can reinvoke a certain old request.
CGL.mashup.init:
All initialization work is done here.
CGL.mashup.urlbuilder:
This object provides functions which can ease construction of request URL to access various resources.
CGL.mashup.service:
This object provides functions which send various requests (e.g. get user information) to server side.
CGL.mashup.helper:
This object includes some utility functions.
GL.mashup.htmlformatter:
This object contains functions that can be used to display response in a specific format .
CGL.mashup.jsonresponse:
This object handls JSON responses from server and parses the content.
CGL.mashup.opmapper:
This object maps operation names to concrete function implementations. Callback can be specified as well.

Web2.0 Integration Summary

The server-side architecture is described here:
http://zhenhua-guo.blogspot.com/2008/05/mashup-architecture.html.

Authentication: OpenID which is described here (http://zhenhua-guo.blogspot.com/2008/05/openid.html).
Authorization: Although OAuth seems promising, it has not been supported by large web 2.0 applications. So, I make use of various authorization mechanisms of different applications.

RESTful web services are used instead of SOAP-based web services. URL pattern used to access various resources is described here(http://zhenhua-guo.blogspot.com/2008/05/url-pattern-in-mashup.html).

At client side, Ajax is used to enhance user experience. Client side functionality is described here(http://zhenhua-guo.blogspot.com/2008/06/client-side-techniques.html).

Friday, May 23, 2008

Javascript Templates

Javascript Templates(http://code.google.com/p/trimpath/wiki/JavaScriptTemplates) is a sub project of project Trimpath. It is a client-side template engine whose functionality is similar to server-side Velocity and Smarty engines. It uses special markup syntax. Besides simple template matching and replacing, it also supports simple control flow, loop and variable declarations... Now I summarize the syntax:
Statements:
(1) Variable Declaration
Syntax Example
{var variable}
{var variable = value}
{var price}
{var price = 10}
Note: No ending ';' is needed.

(2) Control Flow

Syntax Example:
{if expression}
    {elseif expression} ...   
    {else} ...
{/if}
{if price > 10}
    {elseif price <20}...  
    {else}...
{/if}
Note: No surrounding brackets are needed in test expression. No white space between first '{' and 'if'.

(3) Loop

Syntax Example
{for varariable in list}
   statements go here
{/for}
{for price in pricelist}
    ${alert(price)}
{/for}

(4) Expression

Syntax Example
${expression} ${car.brand}
${expression|modifier} ${car.brand|capitalize}
${expression|modifier1|modifer2} ${car.brand|default:"chevy"|capitalize}
... ...

Value of the expression will be returned.

Note:
Statement for( ; ; ) is not supported.
These statements are parsed and processed by Javascript Template Library instead of javascript itself.

More:
(5) CDATA Text. Tag is cdata.
CDATA Text will be ignored and will not be processed.
(6) In-line javascript block. Tag is eval.
Multiple line javascript code can be put in a single block to evaluate.
(7) If you have multiple-line js code, you can use minify to tell processor to treat them as a whole.
For example:
<input type="button" onClick="{minify} Javascript event
handling code...
{/minify}">

Note: eval and minify are different althought they are sort of similar.

How to process templates?
API: http://code.google.com/p/trimpath/wiki/JavaScriptTemplateAPI.
Commonly used functions:
(1) TrimPath.parseDOMTemplate ( elementId, contextObject )
This function retrieves content of the element corresponding to the first parameter. It should be a textarea element and its should be hidden.
The second parameter is a context object and it will be "merged" with the template. For example, if a template refers to ${car}, then the processor tries to access contextObject.car.
(2) TrimPath.parseTemplate ( templateContentStr )
This function accepts a string as template instead of a dom element id.
You can parse a string template in this way:
TrimPath.parseTemplate( stringvariable ).process( contextObject ).

Variable Resolvation Precedence:
There are three kinds of scopes:
(1) Processor scope: it consists of all template statements.
(2) Context object scope: All properties of the context object.
(3) Local scope: local variables whic are not defined in template.

Case 1: In template expression and {eval}:
Processor scope is checked first, then context object is checked. At alst, local scope is checked.
For example:
    var data={car : "chevy"};
    var str = '${alert(car)}';
    str.process(data);        //alert "chevy"

    var str2 = '{var car = "ford"} ${alert(car)}''
    str2.process(data);      //alert "ford"

    var car = "toyota";
    var str3 = '${alert(car)}';
    str3.process();      //alert "toyota"

Case 2: All variables defined in template do not have effect in local scope.
For example:
    var str = '{var car="chevy"}${alert(car)}';
    str.process(data);        //alert "chevy"
    alert(car);                   //variable 'car' is not defined.

Sunday, May 18, 2008

Template

Here is link which suverys browser-side templating: http://ajaxpatterns.org/Browser-Side_Templating.
The goal of browser-side templating is to separate presentation and logic. And in my application, I think it will be helpful to use browser-side templating to ease the development. Currently, JSON messages are received from server and then formatted accordingly to display them to end users.

In next step, I would like to try JTL(Javascript Template Library) http://code.google.com/p/trimpath/wiki/JavaScriptTemplates.

Thursday, April 10, 2008

Add image support in web2.0 app

I added image support in the web2.0 app. It means that users can uploads image files besides regular text files. Users can attach tags, description and name when uploading an image. Other users can post comment/rating about the image.

When an image is uploaded, it will be stored somewhere at server side. Moreover, it can be retrieved by accessing a URL. In other words, the server generates a URL which can be used to access that image. When a user tries to retrieve the image, it will be displayed in browser by using img elment.

Currently, I am using suffix of file name to judge type of record (image or text). The advantage is that user intervening is not needed. Drawback is that sometimes suffixes are not accurate. It may be better to use MIME type which is specified when user uploads an object.

A Simple Web 2.0 Framework

I have completed a simple application which supports common web 2.0 features: rating, commenting, tagging.
Demo address is: http://156.56.104.196:8080/tagService/index_ui.html.

The basic unit in my system is called record. A record is abstraction of an object. Theoretically, it can be of any type: image, text, presentation... However, the key issue is how to present different types of records to end users. Text is easy to present and it can be displayed to users directly. For image, img element can be used but it requires that the image be stored somewhere on the website so that it can be accessed by visiting a URL. Currently, only text is supported. When a user retrieves some record, text content of that record is displayed directly in browser.

Operations:
(1) Add a new record
Users add a new record by uploading a file to server and specifying name, description and tags. Then a unique id is generated for this new record at server side.
(2) List all records
Get all records in the system.
(3) Get a record based on its id
According to record id, get corresponding id.
(4) Get records according to tag
According to user-specified tag, corresponding records are returned. Currently, users can only specify a single tag.
(5) Post comment and rating of a certain record
Users can post comments and ratings about records.
(6) Comment and rating of comment.
Besides comments of records, comments of comments are supported. It means that users can post comments about existing comments besides records.

Architecture:
web20_arch_ws 
Client sends request to a server which uses servlet to handles it. Then the servlet accesses a web service which provides web 2.0 functionalities.

Presentation location:
What is stored in backend database is raw data. And it does not contain information about how to present it to end users. E.g. layout, font-size...
There are two strategies to transform raw data into final presentation data: server-side servlet and client-side javascript.
(1) Server-side servlet

web20_arch_html_ws
When servlet responds to user's request, a HTML document is returned. The HTML document does not only contains data but also contains presentation information. So it can be displayed directly. In this method, servlet formats the raw data received from web service into a corresponding HTML document.

(2) Client-side javascript

web20_arch_json_ws 
In this method, servlet just returns raw data in JSON format. It means returned data does not contain any presentation information. And client side javascript displays the raw data in a specific manner. Actually, to use this method, AJAX should be used. Object XmlHttpRrequest can be used to make asynchronous request without refreshing whole page.

Personally, I prefer the second method.
I remember there are some server-side Java libraries which can be used to make transformation execute with ease.

AJAX
    AJAX is used frequently. However, the format of request is not XML. I manually compose POST query in Javascript and then send it by using XmlHttpRequest. Actually, I use application/x-www-form-urlencoded which is the default data encoding of form submission. I chose this encoding because it is simple compared to the other encoding - multipart/form-data. To make it work well, the data must be escaped.
    Responses from server are in JSON format. So javascript decodes JSON string and dynamically modifies web page accordingly.
    An alternative method is to use XML-RPC.

Possible future work:
(1) User management
Currently, the system is open and everyone can use it anonymously.
(2) RESTful access
(3) Support image type in presentation layer.
(4) Persistence of server data.

Wednesday, April 09, 2008

Dynamic web page development

Recently, I am working on creating a simple web2.0 framework which enables commenting, rating and tagging. Of course, there are two parts: client side and server side. Client side programming using Javascript almost kills me because of incompatibility among different browsers.

(1) When content of a div element exceeds size of the div box, different browsers responde in different ways.
In IE, you can use white-space and word-break to force word wrap.
in FireFox, unfortunately there is not an easy way to do it. You can use overflow property to force a scroll bar. However, this is not what I want. I want the text wrapped automatically.

(2) Following is a piece of javascript:

var inputele = document.createElement('input');
inputele.setAttribute('type', 'button');
inputele.setAttribute('name', 'testbutton');
inputele.setAttribute('value', 'click me');
inputele.setAttribute('onClick','javascript:alert(\'hello,world\');return false;');

In FF, it works well. But in IE, it does not work. It seems that setAttribute can not be used set event handlers.
Instead, you should use attachEvent.

inputele.attachEvent('onclick', function(){ ... });
Or:
invokeStr = "calculate(1,2)";
inputele.attachEvent(onclick', function(){ eval(invokeStr); }

Besides, you can not use setAttribute to modify style property in IE.
In IE:

element.style.display = "block";
element.style.position ="relative";
...
In FF:
style = 'display:block; position:relative;';
element.setAttribute('style', style); 

Moreover, name property of a newly built input element can not be modified after the element is created. Official description is here http://msdn2.microsoft.com/en-us/library/ms536389(VS.85).aspx. Stupid, right?
It means in IE you must use:

var inputele = document.createElement('<input type="button" name="buttonname" value="click me"></input>');

Many many others......

Currently, I make use of object navigator to judge type of browser. For IE, navigator.appName is "Microsoft Internet Explorer". Actually, navigator.userAgent provides detailed information about browser.

Thursday, February 07, 2008

Workflow Queue Support

In previous implementation, I separated jobs from workflows. A job is a small task which currently is written in Karajan workflow language. Here, it is kind of confusing. Karajan workflow language is used to represent a job. A workflow consists of jobs number of which is variable. A workflow queue consists of some workflows. Workflows in a workflow queue can be executed in arbitrary order, which means that these workflows are totally independent. However, jobs in a workflow are usually related so that they should be executed in a certain order. Essentially workflow queue and workflow do not have fundamental difference because we can convert between them. So, difference is in logical level.
Now, workflow queue is supported.

Workflow management panel
wf_management copy 

When a new workflow is added, a new tab is created.
When an existing workflow is removed, the associated tab is removed from the user interface.
wf_management2 copy 

When a user creates and adds a new job, it can add this job to any existing workflow. Because we have created a workflow called "new_workflow1", this workflow appears in the drop box.
wf_management3 copy

When a user switches to the workflow panel, all jobs belonging to the workflow will be displayed in a canvas. What's more, relationship between jobs is displayed as well.
wf_management4 copy

When a user wants to see details of all jobs in a workflow, he/she can click button "click to see all jobs" and then a pop-up window is displayed to show detailed information.
wf_management5 copy

Sunday, January 20, 2008

Add Support for Job Dependency Edit

Lately, I have been working on support for client-side job queue management and job dependency management.
This two parts can be designed and implemented separately. But I think putting them together is better which is more user-friendly.
Before jobs are submitted, they are maintained at client side.
Currently, following functionalities are supported:
(1) add a job to job queue
(2) remove a job from job queue
(3) edit dependency between jobs.
To make the system easy to use, I provide visual widget interface.

Main interface:
job_management_small
Job addition:
After a use inputs the workflow description in the text area and workflow name in the text field, he/she can add the workflow to job queue by clicking button "Add to Queue". If a job with that name has already existed, a prompt window is popped up. Then user can choose to overwrite current job or modify the name.
By clicking button "Job Management" or tab "Job Management", user can be redirected to job management panel.
Note: name of every workflow must be specified. In other words, value of text filed "Workflow Name" can not be left blank. Moreover, different workflows/jobs can not have a same name. So name of every job must be different.

Job Management Panel:
As described in the picture, every rectangle represents a job and every line with arrow represents dependency between two jobs.
When a use adds job1, job2,...jobn, the default relation is that job2 depends on job1, job3 depends on job2 and jobn depends on jobn-1.
When you move curse over a rectangle for a few seconds, a pop-up window is displayed which contains the content of that job.
job_dependency_panel 

When you right click (click with right button) a rectangle, a context menu is displayed. This menu contains several items.
job_dependency_panel_contextmenu
Currently, items are "from", "to", "delete" and "edit".
(1) If menu item "delete" is clicked, the corresponding job will be deleted permanently from job queue.
   When a job is deleted, all related dependency is deleted as well. There are two kinds of dependency: one is that some other jobs depend on this job; the other is that this job depend on some other jobs.
(2) If menu item "from" is clicked, the corresponding job is marked as the starting point of dependency. Assume it is called parentJob.
(3) If menu item "to" is clicked, the corresponding job is markded as the end point of dependency. Assume it is called childJob.
Then there are three possible steps:
  (3.1) If parentJob is null.
    In this case, it means the user has not selected a job by clicking menu item "from". Then nothing will happen.
  (3.2) If job parentJob is not prerequisite of job childJob.
    And then a line is drawn from the rectangle which represents job parentJob and the rectangle which represents job childJob. And job parentJob is considered as prerequisite of job childJob.
  (3.3) If job parentJob is already prerequisite of job childJob.
    In this case, there must be an existing line drawn from the rectangle which represents job parentJob and the rectangle which represents job childJob. Then this relation is deleted and the line is removed from display.
(4) If menu item "edit" is clicked, the system will redirect user to the workflow edit panel.

User can use drag-and-drop to move the rectangles to anywhere in the screen. Related lines (two situations: one is that some lines starts from this job; the other is some lines ends at this job) are moved as well. Note: You can not use drag-and-drop to move the lines.
Following picture is a sample job dependency graph I got:
job_dependency_sample
Next step:
Currently, all operations above are carried out at client side and no interaction with server is involved.
Issue:
Next step is related to how to send the job queue to server side.
In Karajan, I don't think workflow-level composition is supported directly. However, Karajan provides two elements parallel and sequential which can control the execution sequence of subtasks in a workflow.
So one idea is that all jobs in a job queue are put into a single big workflow which uses elements parallel and sequential to represent original relationship.  One natural question is that whether elements parallel and sequential are enough to express any possible relationship among jobs.
My answer is no.
For the job dependency shown above, I can not think of a way to represent it  with Karajan elements parallel and sequential.
Solution 1:
So, if my conclusion is correct, we can implement a sub system which manages sequence of job submission to underlying grid infrastructure. In my opinion, it is better to be put at server side.
Solution 2:
Aother solution is that we can simplify this issue at cost of losing performance. We can get a job submission sequence by using topological sort. In other words, all jobs are submitted sequentially. Obviously, performance is not the best because some jobs actually can be executed in parallel.

Friday, January 11, 2008

Tutorial

(1) Workflow submission

ui_annotated_1

(1.1)If you already have an existing workflow, you can just paste it into the input area and click button “WS Workflow Submission”.

(1.2)If you just want to get familiar with the user interface and content of workflow does not matter, you can click button “click to see example” and you will see a pop-up window which contains a sample window. Then you can copy it and paste it into the input area. Now, you can submit it. The pop-up window will be hidden if you press “Esc” key or if you click anywhere else which results in that the pop-up window loses focus.

After workflow is submitted, response from server is displayed in the area labeled as “Response from server”.

Note: response is appended to the content of the output area. So if you want to discard the existing response, you should clear it first by clicking button “clear”.

Sample response is:
-------------------------------------------------
(This is done by using web service with status monitoring enabled)
ID for the workflow you just submitted is:
test_79
You can use it as a handle to check its status.
As you see, the workflow id for the workflow you just submitted is returned. And then you can check its status.

(2) Workflow status query

ui_annotated_2

(2.1) If you want to query status of all submitted workflows belonging to your, just click button “Get State of All Workflows”.

(2.2) If you want to query status of specified workflows, you should input ids of the workflows status of which you want to query. Then click button “Get State of A Workflow”. Note: name of the button is kind of misleading. Actually, more than one workflow can be queried every time. Multiple workflow ids should be separated by line feed, blank space and tab.

Note: response is appended to the content of the output area. So if you want to discard the existing response, you should clear it first by clicking button “clear”.

(3) Workflow composition

When the widget toolbox is expanded, it looks like:

wf_composition1

When you move cursor over a certain element in the panel, a pop-up window is displayed to show brief description of that element. When you move cursor out of the element, that pop-up window disappears.

wf_composition3

If you want to insert an element into the workflow, just click the corresponding element in the toolbox panel. If that element does not have parameter, corresponding xml snippet is directly inserted into the workflow. If the element has attributes which need to be set, a window will be popped up. For element “execute”, the pop-up window looks like this:

wf_composition2

You can specify values of various attributes and insert it into workflow by clicking button “Save”. You don’t need to specify values of all attributes. In other words, you just need to set values of those attributes you need.

The xml snippet is not simply appended to existing content of the input area. Instead it is inserted into current caret position in the input area. Moreover, the xml snippet can be inserted to enclose your selected text.

Wednesday, January 09, 2008

Milestone

Recent effort:
(1) add functionality that user can query status of a workflow based on combination of username and workflow id. Moreover, users can query more than one workflow in a single query.
(2) modify user interface.
    add tab panel so that submission panel and status query panel are separated.
(3) Modify the stuff returned after a workflow is submitted.
    Originally, after user submits a workflow, nothing will be returned until the workflow
    is executed completely.
    Now, after user submits a workflow, the workflow id is returned. And the workflow
    id can be used as a handle to query status of the workflow.
(4) Modify the location of configuration file.
    Modify the method by which configuration file is located(Absolute path -> relative path).
    Here it took me lots of time because it is not so easy to get the current working directory
    in Axis2.

So, now the whole system satisfies our basic requirements.
Client side:
(1) workflow submission
(2) workflow status query
(3) user-friendly visual widget support for workflow composition
Server side:
(1) simple user management
(2) workflow execution ( by using CoG kit)
(3) workflow status service

Possible future work:
(1) More sophisticated user management system
(2) Security
(3) To support more powerful status query.
    For example, query which workflows are completed, query which workflows are started but not completed, query which workflows have not started to execute ...

Thursday, December 27, 2007

BugFix and Improvement on Karajan workflow Composition

Last week, I implemented a basic visual Karajan workflow composition interface which eases wokflow composition. This is the related post: http://zhenhua-guo.blogspot.com/2007/12/karajan-workflow-composition.html.
This week, I fixed several bugs and made some improvements on top of it.
(1) The configuration of Karajan workflow is stored in a javascript object like this:
{
    elements: {},
    namespaces: {
    	kernel:{
    		elements:{
    			import:{
				properties: [],
				widgetProps: {}
    			}
    		},
    		namespaces:{
    		}
    	},
        sys: {
            namespaces: { },
            elements: {
                execute: {
                    properties: ["executable", "host", "stdout", "provider", "redirect"],
                    widgetProps: {height:"40px, width:"40px"}
                },
                echo: {
                    properties: ["message", "nl"],
                    widgetProps: {}
                }
            }
        }
    }
}

Note the element of which color is blue. Name of that Karajan element is "import" which is also a keyword of Javascript. As a result, the object above is not legal javascript object!!! So more work is needed here. To work around this problem and make the architecture more scalable, I add one more layer between the configuration object above and the code that uses it.
I construct an element tree called KarajanElementTree of which nodes are KarajanNSNode or KarajanElementNode. KarajanNSNode corresponds to a namespace in Karajan and KarajanElementNode corresponds to an usable element in Karajan. In other words, given a workflow configuration, I build a tree based on it. The tree has a set of fixed interface which can be used by programmers to access the information of various workflow elements. When underlying workflow configuration is modified, I just need to change implementation of the tree with interface staying the same. In other words, workflow configuration and use of the workflow are completely separated so that change of one part does not require change of the other part.
Concretely speaking:
(*) underlying workflow configuration
For those elements of which names are keywords of Javascript, I append a '_' to the element name and add a new property called "truename" to record the real name. Some people may argue that the real name can be obtained by removing the '_' character from the end of the name. Yes, that is right. However, considering the future expansion, my choice is better. For example, maybe one day "import_" becomes a keyword of javascript as well or '_' charater can not be contained in name of a property. Then we need to modify the code which handles the extraction of the real name from the element name.

{
    elements: {},
    namespaces: {
    	kernel:{
    		elements:{
    			import_:{
				truename: "import",
				properties: [],
				widgetProps: {}
    			}
    		},
    		namespaces:{
    		}
    	},
        sys: {
            namespaces: { },
            elements: {
                execute: {
                    properties: ["executable", "host", "stdout", "provider", "redirect"],
                    widgetProps: {height:"40px, width:"40px"}
                },
                echo: {
                    properties: ["message", "nl"],
                    widgetProps: {}
                }
            }
        }
    }
}

(**) Intermediate Element Tree
    KarajanElementNode:
    [ properties ]:
        name: name of the element, this is the name used to retrieve the object corresponding to that name in Javascript;
        truename: real Karajan name of the element.
        properties: properties of the Karajan elements;
        widgetProps: properties of the corresponding widget
    KarajanNSNode:
    [ properties ]:
        name: same as above;
        truename: same as above;
        elements: contains all elements in this namepace;
        namespaces: contains all sub namespaces in this namespace.
    KarajanElementTree:
    [ properties ]:
        root: root of the tree. Typically, type of the root is KarajanNSNode.
(***) Upper layer that uses the Karajan workflow

	var workflowele = getEle( KarajanElementTree, elementname );
	var realname = workflowele.truename;

Now, to get the information of a Karajan element, we don't need to know the underlying mechanism. For example, name of the element can be gotten by accessing property "truename".

(2) Empty namespace and element list elimination
In previous implementation, a new accordion panel is created for every namespace and element list no matter whether they are empty. As a result, the widget toolbox looks jumbly.
Now, I improve it. When a namespace is empty or an element list is empty, don't create an accordion panel for it at all.

(3)Add Pop-Up Window to display element description
In Karajan, there are hundreds of elements. Besides that, users can define their own customized elements. It is hard for a user to remember usage of so many elements. Sometimes, a user has used a certain element, but he/she cannot remember the usage of the element. At this time, a simple suggestive message is enough.
So, I add a new property "description" to every element which describes the usage and functionality of that element. When user moves cursor over a widget, the corresponding description is displayed in a pop-up message window. When user moves cursor out, the window disappears.
Screenshot:
wf_composition3 

(4) Better Support in Element insertion
In previous implementation, a Karajan element can just be inserted into current caret position. It is possible that user wants selected text to be enclosed by a certain element.
For example, we have workflow like this:

<project>
	<transfer srchost="aaa.com" srcfile="file1" desthost="localhost" destfile="file1"/>
	<transfer srchost="bbb.com" srcfile="file2" desthost="localhost" destfile="file1"/>
	<transfer srchost="ccc.com" srcfile="file3" desthost="localhost" destfile="file1"/>
</project>

The three transfer jobs are independent of each other. We would like to let them executed in parallel. Karajan element "parallel" can be used now. If we just support insertion of elements into current caret position, the user needs to first insert element "parallel" somewhere, and then copies "</parallel>" and paste it after the last transfer job. What is better is that user can select the jobs that want to be executed in parallel and element "parallel" will enclose the selected jobs during insertion.
Now, I have implemented this functionality. However, it sometimes does not work well in IE....

(5) Add more Karajan elements into the configuration object
    Karajan workflow contains so many built-in elements so that it is not practical to add all the elements into the javascript configuration object at a time. I decide to gradually add them to the object. Now, I have added many, but still many left...

Thursday, December 20, 2007

Karajan workflow composition

Recently, I am focusing on providing visual widgets to ease composition of Karajan workflow. It is not practical to build the application from scratch. I have surveyed several prevailing javascript/Ajax frameworks including qooxdoo, prototype, jQuery, Ext, mootools.
Survey of js frameworks:
(1) jQuery(http://jquery.com/)
   As its name implies, its emphasis is query. At first sight, the framework is beautiful and concise. It supports CSS dom selector and XPath syntax.  Besides, it provides further convenient selection syntax. Some examples follows:
   $("a")
   $("a[@name]")
   $("a[@href=content/resources]")
   $("ul > li")
   $("ul li")
   $("ul .list > a")
   $("#output")
More examples:
   $("li:eq(0)")   //gets the first item
   $("li:lt(3)")    //get the first three items
   $("li:not(.groove)")    //get li elements without class groove
Beautifully, right? We can do lots of work by code of just several lines!!
Chaining: Most functions return a jQuery object so that you can directly invoke more functions.
$('form#login')
    // hide all the labels inside the form with the 'optional' class
    .find('label.optional').hide().end()

    // add a red border to any password fields in the form
    .find('input:password').css('border', '1px solid red').end()

    // add a submit handler to the form
    .submit(function(){
        return confirm('Are you sure you want to submit?');
    });

No matter whether you like this kind of code or not, it is functionality provided by jQuery. I prefer to use multiple lines of code and self-documenting variable names which look clearer.
Plug-ins: jQuery is blooming considering number of its plug-ins. Plug-ins increase sharply recently and many developers contribute to it.
However, jQuery does not excel at UI. In other words, if you want to build fancy user interface, jQuery is not the first choice.

(2)Ext(http://extjs.com/)
   Originally, Ext was based on YUI and it was developed as extension for YUI. Then, Ext broke away from YUI and was developed as an independent project.
   Its emphasis is abundance of UI widgets. It provides many fancy and convenient UI widgets which can be used easily to build our own GUI. The configuration of UI widget looks like this:
   var panel = new Ext.Panel({
      title: "This is title",
      width: 400,
      height: 300,
      border: true,
      layout: "accordion",
      items: [ .... ]
   });
It is more convenient than invocation of bunch of functions to set values of properties(e.g. panel.setwidth(400); panel.setheight(400);...).
Not long ago, combination of jQuery and Ext was announed which is good news to web application developers. However, process of the combination is kind of slow and support of jQuery in Ext 2 is limited and buggy.

(3)Qooxdoo
  
This framework is sort of comprehensive which includes almost all common functionalities. Documentation is not bad. It is growing rapidly and seems promising.
   However, current version of this framework is 0.7, which means it is still in beta phase and not appropriate for production use. Apart from that, it aims to control the whole web page by Qooxdoo. So it is difficult for end users to directly access/modify underlying dom element. This drawback is annoying because inevitably  users sometimes want to manipulate underlying elements directly.

(4)Dojo(http://dojotoolkit.org/)
    This framework is so comprehensive and complex. It is the most powerful framework I have ever seen. It provides lots of functionalities: UI widgets, event system, offline support, presentation... As a result, the framework is sort of bloated and cumbersome. Bugs are not rare... Besides, documentation is done badly which makes development more difficult.
    Maybe, in the future, Dojo will become outstanding in term of functionality, performance and documentation. But for now, it is far from that.

(5)Prototype(http://www.prototypejs.org/)
    This framework adds basic OO features to javascript, e.g. inheritance. It is actually a language(javascript) extension library. Moreover, it extends some built-in objects (String, Array...) of javascript to offer more convenient functionalities. Script aculous(http://script.aculo.us/) is built on top of prototype and provides UI widgets.
    I read some articles about prototype and it seems that the support for OO features has problems in some situations.

Karajan Workflow Composition
Anyway, finally I chose Ext as my javascript framework.
Some screenshots about the workflow composition panel:
wf_composition1 
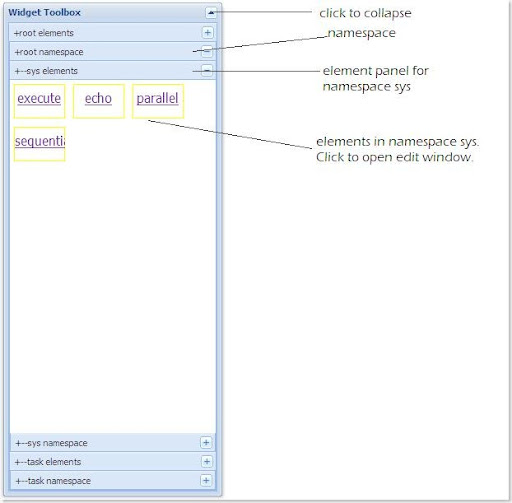
The panel is organized according to namespaces. So if user knows the namespace of an element, it is effortless to find the corresponding widget in the toolbox. And all main panels structured into accordion layout. If user clicks the title bar of a panel, that panel is expanded and all other panels are collapsed.

Karajan workflow element edit panel:
wf_composition2 
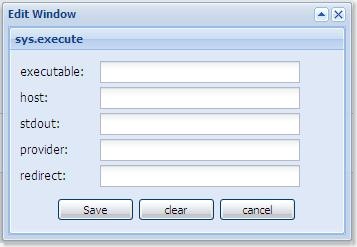
After values of various properties are typed, the xml document corresponding to the element will be automatically inserted into output panel. For sys.execute element, the xml snippet looks like this
    <sys:execute executable="..." host ="..." stdout="..." provider="..." redirect="..."/>
Currently, all values are enclosed by double quotation marks. The reason is that Karajan workflow is XML document in nature. For xml document, value of every attribute/property MUST be enclosed by quotation marks.
For other workflow languages,this is not always correct because types of some properties are integer/boolean and these values should not be enclosed by quotation marks.
After user clicks "Save" button, the generated xml snippet is inserted into output panel. The xml snippet is not simply appended to the output panel. Instead, it is inserted into current cursor position.

Scalability and Maintainability
    During design, I always keep a principle in my mind: built-in elements of Karajan are abundant and users can add their own customized elements. As a result, the addition of elements to widget window/toolbox should be easy and scalable.
The configuration is a javascript object:

{
    elements: {},
    namespaces: {
        sys: {
            namespaces: {
                file: {
                    elements: {
                        read: {
                            properties: ["name"],
                            widgetProps: { }
                        },
                        write: {
                            properties: ["name", "append"],
                            widgetProps: {}
                        }
                    },
                    namespace: {}
                }
            },
            elements: {
                execute: {
                    properties: ["executable", "host", "stdout", "provider", "redirect"],
                    widgetProps: {height:"40px, width:"40px"}
                },
                echo: {
                    properties: ["message", "nl"],
                    widgetProps: {}
                },
                parallel: {
                    properties: [],
                    widgetProps: {}
                },
                sequential: {
                    properties: [],
                    widgetProps: {}
                }
            }
        }
    }
}

In Karajan, namespace is supported. For every namespace, there are two properties: elements and namespaces. Property elements contains information about those elements directly in the namespace. Property namespaces contains information about sub namespaces.
In above example, namespace sys contains elements execute, echo, parallel and sequential and it contains sub namespaces file. Then namespace file contains elements read and write and it contains no sub namespaces.
For every element, it contains two properties: properties and widgetProps. Property properties contains list of parameters about the elements. Property widgetProps contains configuration information about how to display the corresponding widget in the toolbox window.
In above example, element execute has properties executable, host, stdout, provider and redirect.
To add more elements, I just need to modify the configuration object shown above. Obviously, it is convenient to modify it.

Improvements we can do in the future
(1) Now I list all properties of an element in the edit panel. For some elements, number of properties is more then ten. But only some properties are used frequently and others are seldom used. In the future, we can first hide the optional properties and only display the necessary properties. If user wants to use all properties, we show those optional properties as well.
(2) Search functionality. Number of elements may be enormous and it is painful to browse all namespaces to find the desired element.
However, this improvement is not necessary. Official website of CogKit provides reference manual for Karjan workflow and detailed information about all elements of Karajan is included. So user can first consult the reference manual for detailed information on the desired element. Then the user will get the fullname of the element which includes name of namespace in which the element is located. According to namespace, it is very easy to find the corresponding widget in the toolbox.

Friday, December 14, 2007

Client Side Enhancement

Obviously, it is not a favorable job to directly compose XML workflow file. Users may spend more time on XML formatting (start tags, end tags ...) than on business logic. So it is good news to provide auxiliary tools to ease composition of workflows. Visual widgets which support drag and drop can be used. In web2.0, there are several mainstream technologies including Ajax, Flash, Flex, Silverlight and OpenLaszlo, etc. I think Ajax is preferred because it can be run on almost all platforms. Support for Ajax is almost built in every prevailing browsers.
If we decide to use Ajax, it is time consuming to build our application from the scratch, considering there are so many mature Ajax frameworks. I can list some frameworks here: dojo, qooxdoo, jquery, prototype, mootools, GWT, YUI, Ext ... I have surveyed these frameworks.
GWT is developed by Google and YUI is developed by Yahoo. GWT provides conversion from Java to Javascript so that programmers can use Java to build web application. However, the customization of the webpage (layout, style ...) is not convenient.
Frameworks Prototype, Dojo, Qooxdoo, Jquery and mootools are all open-source and they have their own good and bad. However, the difference is kind of subtle. I used Qooxdoo in previous project and I don't recommend us to use it. All other frameworks seem good and further investigation is necessary to pick up the most appropriate one for us.

Tuesday, October 23, 2007

XML-RPC Usage

Currently, I am focusing on building client and server programs which communicate with each other by using XML-RPC.
Client
To support XML-RPC at client side, there are two choices. I write javascript functions that handle XML-RPC related stuff --encoding, decoding, escape ... I read the XML-RPC specification. It is not long, just a few pages. However, to implement a robust and steady xml-rpc javascript library is not so easy as it looks. I don't have so much time to do this. So, I chose to make use of existing library. I surveyed many XML-RPC javascript libraries. Shortly afterwards, I found that most of the libraries were not satisfying. For example, some libraries even don't escape the parameters passed to a method. If a parameter is a string and it contains '<' characters, those '<' characters must be escaped in order not to confuse the server because '<' marks start of a tag!! After trying lots of times, I found two good libraries. One is mozilla xml-rpc javascript library which is used by Firefox. However, it requires additional javascript libraries which are basis of Firefox javascript libraries. To use it, lots of libraries are needed and obviously this is cumbersome.  The other good library is Javascript O Lait which builds generic architecture to allow users to create and import module. In addition to support of modularity, it provides many useful modules, such as Codec, JSON-RPC, XML-RPC, String extension ... At last I decided to use Jsolait. Key code is:
var url = "http://127.0.0.1:8080/sample/xmlrpc";//The path must comply with configuration at server side
var methods = ["zhguo.handler.inBound"];//This is the full qualified name of the method you want to invoke. 
     //Note: this must comply with the configuration at service side
var xmlrpc=null;
try{
    xmlrpc = imprt("xmlrpc"); //import the needed module
}catch(e){
    throw "importing of xmlrpc module failed.";
}
 
try{
 var service = new xmlrpc.ServiceProxy( url, methods );
 var from = "home", to = "rpc";
 service.zhguo.handler.inBound( from, to );//directly call the method by using service object
}catch(e){
 alert( e );
} 
Server

I make use of Apache XML-RPC Java library. There is no detailed document on the web. Official website has some description on how to quickly build application based on XML-RPC. There are several ways you can use the XML-RPC service. I chose to embed it in Tomcat container. Key procedure is:
(1) Edit the web.xml
<?xml version="1.0" encoding="ISO-8859-1"?>
<web-app xmlns="http://java.sun.com/xml/ns/javaee"
   xmlns:xsi="http://www.w3.org/2001/XMLSchema-instance"
   xsi:schemaLocation="http://java.sun.com/xml/ns/javaee http://java.sun.com/xml/ns/javaee/web-app_2_5.xsd"
   version="2.5">
  <display-name>Test for XML-RPC</display-name>
  <description>This is a test for XML-RPC</description>
 <servlet>
  <servlet-name>XmlRpcServlet</servlet-name>
  <servlet-class>org.apache.xmlrpc.webserver.XmlRpcServlet</servlet-class>
  <init-param>
   <param-name>enabledForExtensions</param-name>
   <param-value>true</param-value>
   <description>Sets, whether the servlet supports vendor extensions.</description>
  </init-param>
 </servlet> 
 <servlet-mapping>
  <servlet-name>XmlRpcServlet</servlet-name>
  <url-pattern>/xmlrpc</url-pattern>
 </servlet-mapping>
</web-app>
(2) Create your service. My sample class is:
package zhguo.test;
public class SimpleHandler{
 public SimpleHandler(){}
 public String inBound( String from, String to ){
  return "thank you, " + from +", for calling " + to;
 }
}
And put the corresponding .class file in the directory WEB-INF/classes/zhguo/test/.
(3) Add a file called XmlRpcServlet.properties under directory WEB-INF/classes/org/apache/xmlrpc/webserver/. Content of the file is
zhguo.handler=zhguo.test.SimpleHandler
Note: zhguo.test.SimpleHandler is the class which provides service to XML-RPC client. The public functions in this class are exposed by Apache XML-RPC framework to clients. In other words, clients can invoke public functions defined in class zhguo.test.SimpleHandler. The property name is an arbitrary string. It represents the corresponding service class (In this case it is zhguo.test.SimpleHandler). Clients use this name to access the service. So, in javascript above, one statement is 'var methods = ["zhguo.handler.inBound"]'. Upon receiving the request, the server looks up the class corresponding to "zhguo.handler", invokes inBound function of that class and returns the result.
(4) Put the necessary libraries(XML-RPC .jar files) in the lib directory
(5) Starts the tomcat.
Finally, the directory layout is:
WEB-INF/lib/
WEB-INF/classes/org/apache/xmlrpc/webserver/XmlRpcServlet.properties
WEB-INF/classes/zhguo/test/SimpleHandler.class
WEB-INF/web.xml