Saturday, November 08, 2008

Maven cheat sheet

Download and install maven: http://maven.apache.org/download.html.

Running Maven
http://maven.apache.org/guides/getting-started/maven-in-five-minutes.html
http://maven.apache.org/guides/getting-started/index.html
Generally the local repository is provided in USER_HOME/.m2/repository.

Configuration
http://maven.apache.org/guides/mini/guide-configuring-maven.html
Three levels:

Build your own private/internal repository:
This article introduces how to create a repository using Artifactory: http://www.theserverside.com/tt/articles/article.tss?l=SettingUpMavenRepository. In addition, the author also compares some mainstream maven remote repository managers including Standard maven proxy, Dead simple Maven Proxy, Proximity and Artifactory.
In my case, I also use Artifactory and deploy it to tomcat. It has a nice web-based interface. Artifactory uses database(derby I think) to store various repository data so a user can not know the repository content by directly looking at the directory.

Deploy your artifacts to remote repository by using maven-deploy plugin:
http://maven.apache.org/plugins/maven-deploy-plugin/usage.html
(1) If the artifacts are built by using Maven, you should use deploy:deploy Mojo.
In your pom.xml, element <distributionManagement/> should be inserted to tell Maven how to deploy current package. If your repository is secured, you may also want to configure your settings.xml file to define corresponding <server/> entries which provides authentication information.
Command: mvn deploy.
(2) If the artifacts are NOT built by using Maven, you should use deploy:deploy-file Mojo.
Sample command:
mvn deploy:deploy-file -Dpackaging=jar -Durl=file:/grids/c2/www/htdocs/maven2 
-Dfile=./junit.jar -DgroupId=gridshib -DartifactId=junit -Dversion=GTLAB

FAQ:
(1) What does maven standard directory layout look like?
http://maven.apache.org/guides/introduction/introduction-to-the-standard-directory-layout.html
(1) How to specify parent artifact in pom.xml?
Read http://maven.apache.org/guides/introduction/introduction-to-the-pom.html.
(2) If a dependent package can not be download from central Maven repository, three methods can be used to deal with it:

"
  1. Install the dependency locally using the install plugin. The method is the simplest recommended method. For example:
    mvn install:install-file -Dfile=non-maven-proj.jar -DgroupId=some.group -DartifactId=non-maven-proj -Dversion=1

    Notice that an address is still required, only this time you use the command line and the install plugin will create a POM for you with the given address.

  2. Create your own repository and deploy it there. This is a favorite method for companies with an intranet and need to be able to keep everyone in synch. There is a Maven goal called deploy:deploy-file which is similar to the install:install-file goal (read the plugin's goal page for more information).
  3. Set the dependency scope to system and define a systemPath. This is not recommended, however, but leads us to explaining the following elements:
"
(2) How to add new repository?
Put following code snippet into pom.xml or settings.xml.
<repository>
  <id>your-new-repository-id</id>
  <name>New Maven Repository </name>
  <layout>default</layout>
  <url>Address of the new repository</url>
  <snapshots>
    <enabled>enable-it?</enabled>
  </snapshots>
  <releases>
    <enabled>enable-it?</enabled>
  </releases>
</repository>
(3) How to disable default central maven repository?
Put following snippet into your pom.xml.
<repository>
  <id>central</id>
  <name>Maven Repository Switchboard</name>
  <layout>default</layout>
  <url>http://repo1.maven.org/maven2</url>
  <snapshots>
    <enabled>false</enabled>
  </snapshots>
  <releases>
    <enabled>false</enabled>
  </releases>
</repository>
(4) How can I package source code without run test?
Feed parameter -Dmaven.test.skip=true into the command line.
Note this property is defined by maven plugin surefire.
(5) Why does "mvn clean" delete my source code?
In your pom.xml, if content of element <directory> nested in element <build> is "./", "mvn clean" will delete all content in current directory including the src directory.
There are two more elements which can be used to specify locations of compiled classes.
outputDirectory:  The directory where compiled application classes are placed.
testOutputDirectory:  The directory where compiled test classes are placed.
(6) How to add resources into built package?
http://maven.apache.org/guides/getting-started/index.html#How_do_I_add_resources_to_my_JAR.
http://maven.apache.org/guides/getting-started/index.html#How_do_I_filter_resource_files

Friday, October 10, 2008

Automatically adjust height of IFrame using Javascript

A simple and natural requirement, but unfortunately it may or may not work as you expect.
What matters here is security. If src of an iframe does not access external address, it works well. Otherwise, nothing will solve the problem except that the user lowers the security level. Javascript can not access information of an IFrame whose content is hosted by a third-party site.

Let us assume that src of an iframe does not point to an external resource, following code can be used:

var ele =document.getElementById(frameid); 
ele.style.height = ele.contentWindow.document.body.scrollHeight

You may wonder why document.frames[frame_name] is not used here. Anyway, I tried it on Firefox 3, it did not work. As you know, compatibility is a real pain for web developers.

One possible solution is to set up a proxy server which relays the requests/responses.

Wednesday, September 10, 2008

Some notes about tomcat/hibernate/servlet

Tomcat

For tomcat applications, resources (configuration files...) should be put in directory WEB-INF/classes. The files cannot be symbolic links. They MUST be regular files in order for tomcat to handle them correctly. Of course, you can embed resources into your .jar files.
For Tomcat, the regular CLASSPATH environment variable is IGNORED. The resources (jars, configuration files...) must be put into your tomcat app directory. Read this post to see what is under the hood.
Resource/class search order for web apps: 
  • Bootstrap classes of your JVM
  • System class loader classses (described above)
  • /WEB-INF/classes of your web application
  • /WEB-INF/lib/*.jar of your web application
  • $CATALINA_HOME/lib
  • $CATALINA_HOME/lib/*.jar
The System class loader is the only place where CLASSPATH can be parsed and used. However, tomcat startup script(bin/catalina.sh) totally ignore environment variable CLASSPATH. You will figure it out if you read file bin/setclasspath.sh. In my case, first several lines are :
#  Set CLASSPATH and Java options
# 
#  $Id: setclasspath.sh 589060 2007-10-27 08:19:24Z jfclere $
# -----------------------------------------------------------------------------

# First clear out the user classpath
CLASSPATH= 
Now, you know the root of the problem right? If you want to include CLASSPATH, you can modify the bash file. I have not tried it. It should work.

Hibernate

For hibernate app, corresponding mapping tables must be created before you can run your app. Hibernate will NOT create those tables automatically for you. For the primary key property/column, If you use generator "native", you must set property of the primary key column correctly in order to let database generate primary key values correctly. For example, you can use AUTO_INCREMENT to make database automatically generate primary key values in MySQL. You can choose to use generator "assigned" to assign primary key values in your programs.
For database operations in Hibernate, you should always EXPLICITLY start and commit a transaction.

Servlet/JSP

Method Forward declared in RequestDispatcher should be understood correctly. It is an INTERNAL control transfer. It means this control transfer is TRANSPARENT to end users. One consequence is that the links in the target page, to which you forward control, MUST use absolute path instead of relative path.
For example, first a user sends request to http://domain/users/gerald.jsp. At server side, your servlet internally transfers control to /users/profiles/g/gerald.jsp. In the target page, if you have links with relative path, the paths are relative to the original request path (/users/ in this example) instead of path of the target page (/users/profiles/g/ in this example).
Your servlet should not have generated any response ( in output stream to request sender ) when redirection or forwarding is carried out.

Sunday, September 07, 2008

Hibernate installation (run on MySQL)

Recently, I tried to install Hibernate on gridfarm machine. The version I used was 3.3.0 SP1.
Configuration document can be found here. However, the document seems not to be updated.
(1) Configuration file hibernate.properties vs. hibernate.cfg.xml.
In the document, either one can be used. If both are used, configurations in hibernate.cfg.xml would override configurations in hibernate.properties. The document says using hibernate.properties is an easy way to configure Hibernate. So I chose it. However, after trial I found that in Hibernate 3.3.0 SP1 hibernate.cfg.xml. In other words, you MUST have a configuration file "hibernate.cfg.xml". Of course, you can use programmatical configuration which is not covered in this post.
(2) Logger
In documents, I saw "Hibernate logs various events using Apache commons-logging.". However, when I tried to run my Hibernate app, it complained that logger class can not be found. After inspection, I figured out that Hibernate 3.3.0 does NOT use Apache common-logging any more. Instead it uses slf4j. But in Hibernate 3.3.0 SP1 distribution only slf4j-api jar is included while an implementation is needed to run Hibernate(If you turn off logging, I don't know whether it will still complain). In other words, to use logging functionality, you must download an implementation of logging service supported by slf4j. I used slf4j-simple.
(3) JNDI bindings (for session factory and data source).
Because I just wanted to write a simple prototype without deploying in J2EE server, I chose not to use JNDI bindings for data source or session factory. After several hour trial, I could not get it to work!! I always got the error "org.hibernate.impl.SessionFactoryObjectFactory - Could not bind factory to JNDI".It seemed that Hibernate always was always trying to use JNDI to bind Session Factory. However, the official document says

"A JNDI bound Hibernate SessionFactory can simplify the lookup of the factory and the creation of new Sessions. Note that this is not related to a JNDI bound Datasource, both simply use the same registry!

If you wish to have the SessionFactory bound to a JNDI namespace, specify a name (eg. java:hibernate/SessionFactory) using the property hibernate.session_factory_name. If this property is omitted, the SessionFactory will not be bound to JNDI. (This is especially useful in environments with a read-only JNDI default implementation, e.g. Tomcat.)

When binding the SessionFactory to JNDI, Hibernate will use the values of hibernate.jndi.url, hibernate.jndi.class to instantiate an initial context. If they are not specified, the default InitialContext will be used.

Hibernate will automatically place the SessionFactory in JNDI after you call cfg.buildSessionFactory(). This means you will at least have this call in some startup code (or utility class) in your application, unless you use JMX deployment with the HibernateService (discussed later).

If you use a JNDI SessionFactory, an EJB or any other class may obtain the SessionFactory using a JNDI lookup.

We recommend that you bind the SessionFactory to JNDI in a managend environment and use a static singleton otherwise. To shield your application code from these details, we also recommend to hide the actual lookup code for a SessionFactory in a helper class, such as HibernateUtil.getSessionFactory(). Note that such a class is also a convenient way to startup Hibernate—see chapter 1. "

It turned out that a property called "hibernate.current_session_context_class" must be set.
My hibernate.cfg.xml looks like:
<!DOCTYPE hibernate-configuration PUBLIC
    "-//Hibernate/Hibernate Configuration DTD 3.0//EN"
    "http://hibernate.sourceforge.net/hibernate-configuration-3.0.dtd">

<hibernate-configuration>
    <session-factory>
        <property name="show_sql">true</property>
        <property name="current_session_context_class">thread</property>
        <property name="connection.username">username</property>
        <property name="connection.password">password</property>
        <property name="connection.url">jdbc:mysql://localhost/hibernate</property>
        <property name="connection.driver_class">com.mysql.jdbc.Driver</property>
        <property name="dialect">org.hibernate.dialect.MySQLDialect</property>
        <mapping resource="User.hbm.xml"/> 
    </session-factory>
</hibernate-configuration>
Then, I tried a very very simple read-only JNDI service provider - simple-jndi. My simple-jndi configuration file (jndi.properties which should be put into root of your classpath) looks like:
#The first (required) parameter, org.osjava.sj.root, is the location 
#of your simple-jndi root, which is the location in which simple-jndi
#looks for values when code asks for them.

org.osjava.sj.root=/home/zhguo/share/simple-JNDI/config
java.naming.factory.initial=org.osjava.sj.SimpleContextFactory
Under directory pointed to by org.osjava.sj.root property, I have a jndi data file called hibernate_jndi.properties:
mysql.type=javax.sql.DataSource
mysql.driver=com.mysql.jdbc.Driver
mysql.url=jdbc:mysql://localhost/hibernate
mysql.user=username
mysql.password=password
So, my new version of hibernate.cfg.xml looks like:
<hibernate-configuration>
    <session-factory>
        <property name="show_sql">true</property>
        <property name="current_session_context_class">thread</property>
        <property name="connection.datasource">hibernate_jndi.mysql</property>
        <property name="dialect">org.hibernate.dialect.MySQLDialect</property>
        <mapping resource="User.hbm.xml"/> 
    </session-factory>
</hibernate-configuration>
Note: in the file, session factory name is not set! This is because we are using a read-only JNDI. If you use a read-write JNDI, you can set the session factory name in one of the following ways:
(*) In hibernate.properties file:
hibernate.session_factory_name hibernate/session_factory
(*) In hibernate.cfg.xml file:
<session-factory name="your name goes here">

Wednesday, August 27, 2008

Hadoop and HBase port usage

Hadoop port usage
On name node
50090: org.apache.hadoop.dfs.SecondaryNameNode
33220: ditto.(This port is not fixed and may be changed when hadoop is restarted)

50070: org.apache.hadoop.dfs.NameNode
9000:ditto
46684: ditto(This port is not fixed and may be changed when hadoop is restarted)

9001: org.apache.hadoop.mapred.JobTracker
50030: ditto
60502: ditto(This port is not fixed and may be changed when hadoop is restarted)

On data node
50075: org.apache.hadoop.dfs.DataNode
50010: ditto
45868: ditto(This port is not fixed and may be changed when hadoop is restarted)

50060: org.apache.hadoop.mapred.TaskTracker
55027: ditto(This port is not fixed and may be changed when hadoop is restarted)

HBase port usage
On master
60000: org.apache.hadoop.hbase.master.HMaster start
60010: ditto

On data node
60030: org.apache.hadoop.hbase.regionserver.HRegionServer
60020: ditto

Monday, August 25, 2008

Insert pubchem data into HBase

HBase shell
HBase provides a shell utility which lets users to execute simple commands. The shell can be started up using:
${HBASE_HOME}/bin/hbase shell
Then input command help to get help document which describes usage of various supported commands. These commands can be used to manipulate data stored in HBase. E.g. command list can be used to list all tables in hbase. Command get can be used to get row or cell contents from hbase. Command put can be used to store data into a cell.

Data insertion
Data source is ftp://ftp.ncbi.nlm.nih.gov/pubchem/. I modified python scripts and C source code given by Rajarshi.
Data retrieval and processing steps:

  1. Download all information about compounds from ftp://ftp.ncbi.nlm.nih.gov/pubchem/Compound/CURRENT-Full/SDF. I finally got 123 GB.
  2. Decompress those files
  3. Extract information from these .sdf files and write it to .txt files. Library openbabel is used to compile the C++ code.
  4. Combine those .txt files generated in step 3 into one big .dat file
  5. Write a ruby script to insert all data in the .dat file into HBase.
    Command is like this: ${HBASE_HOME}/bin/hbase org.jruby.Main rubyscript.rb

Why did I write Ruby script instead of Java program in step 5?
HBase is written in Java and so provides Java API. However, to compile Java programs is kind of cumbersome -- set lengthy CLASSPATH ... 
So I chose to write scripts which can be executed directly by HBase shell. I found useful information on this page. There is a section called "scripting" in that post. But the information there is far from complete. It does not tell readers how to write the scripts. At first, I wrote a script which included some shell commands, one command per line, and then fed it to hbase shell. Unfortunately, it didn't work. After enumerous trials, I found that Ruby scripts could be fed to shell. Ruby scripts cannot make use of existing shell commands directly. Ruby binding of original Java APIs must be used.

I have not learnt Ruby at all before. So I must teach myself to grasp basic knowledge about Ruby. Ruby is sort of different in terms of syntactic flexibility. It supports so many shorthands to improve productivity. Anyway, "Ruby is easy to learn, but hard to master". By the way, Ruby documents seem not to be abundant compared with Python, Perl...

How to write Ruby scripts for HBase?
This site http://wiki.apache.org/hadoop/Hbase/JRuby contains related information. But I could not run the sample script successfully because of errors in the script!!! Damn it! I wonder whether the author had tested the code before he released it. Some errors are so obvious.
After the ruby script is completed, it can be executed using:
${HBASE_HOME}/bin/hbase org.jruby.Main rubyscript.rb 
Java API:
http://hadoop.apache.org/hbase/docs/current/api/index.html

My ruby script:

#!/usr/bin/ruby -w

include Java
import org.apache.hadoop.hbase.HBaseConfiguration
import org.apache.hadoop.hbase.HColumnDescriptor
import org.apache.hadoop.hbase.HTableDescriptor
import org.apache.hadoop.hbase.client.HBaseAdmin
import org.apache.hadoop.hbase.client.HTable
import org.apache.hadoop.hbase.io.BatchUpdate
import org.apache.hadoop.io.Text

pubchem_compound_fields = [
    'cid',
    'iupac_openeye_name',
    'iupac_cas_name',
    'iupac_name',
    'iupac_systematic_name',
    'iupac_traditional_name',
    'nist_inchi',
    'cactvs_xlogp',
    'cactvs_exact_mass',
    'openeye_mw',
    'openeye_can_smiles',
    'openeye_iso_smiles',
    'cactvs_tpsa',
    'total_charge',
    'heavy_atom_count']

compound_table_name = 'compound'

numfields = pubchem_compound_fields.length

path = "/home/zhguo/BigTable/BigTable-Pubchem/data/"
filename = "#{path}compound.dat"
file = File.new(filename, 'r')
counter = 0

conf = HBaseConfiguration.new
tablename = compound_table_name
tablename_text = Text.new(tablename)
desc = HTableDescriptor.new(tablename)
coltextarr = Array.new
pubchem_compound_fields.each_with_index do |v, i|
    if (i == 0) then next; end
    desc.addFamily(HColumnDescriptor.new("#{v}:"))
    coltextarr << Text.new("#{v}:")
end

admin = HBaseAdmin.new(conf)
if !admin.tableExists(tablename_text) then
    admin.createTable(desc)
=begin
    puts "deleting table #{tablename_text}"
    admin.disableTable(tablename_text)
    admin.deleteTable(tablename_text)
    puts "deleted table #{tablename_text} successfully"
=end
end

#admin.createTable(desc)
table = HTable.new(conf, tablename_text)

startind = 1641500 #from which line should we start.This
                   #is useful when you don't want to start
                   #from the beginning of the data file.

nlines = `cat #{filename} | wc -l`

logfilename = 'updatedb.log'
logfile = File.new(logfilename, "a")
while (line = file.gets) #&& (counter < 20)
    counter += 1
    if (counter < startind) then
        next
    end
    msg = "processing line #{counter}/#{nlines}"
    logfile.puts msg
    if counter%100 == 0 then
        print  msg
        STDOUT.flush
        logfile.flush
    end

    arr = line.split("\t")
    len = arr.length
        if (numfields != len) then
        next
    end
    rowindex = 0
    rowname = arr[rowindex]
    arr.delete_at(rowindex)
    row = Text.new(rowname)
    b = BatchUpdate.new(row)

    arr.each_with_index do |v, i|
        str = java.lang.String.new(v)
        b.put(coltextarr[i], str.getBytes("UTF-8"))
    end
    table.commit(b)
end

Sunday, August 24, 2008

Installation and configuration of Hadoop and Hbase

Hadoop

Installation
Hadoop installation instructions: http://hadoop.apache.org/core/docs/current/quickstart.html and http://hadoop.apache.org/core/docs/current/cluster_setup.html.
To set up hadoop cluster, generally two configuration files should be modified:
hadoop-site.xml and slaves.
(1) My hadoop-site.xml looks like:
<configuration>
  <property>
    <name>fs.default.name</name>
    <value>pg3:9000</value>
  </property>
  <property>
    <name>mapred.job.tracker</name>
    <value>pg3:9001</value>
  </property>
  <property>
    <name>dfs.replication</name>
    <value>1</value>
  </property>
</configuration>
Read file hadoop-default.xml for all available options.
(2) My slaves file looks like:
localhost
pg1
pg2

I need to install Hadoop on three machines now and I use rsync to make these machines synchronized with eath other in terms of configuration.

Commands
(*) Format a new file system: hadoop namenode -format
(*) Start/stop Hadoop
start-dfs.sh/stop-dfs.sh
start up the distributed file system (HDFS)
start-mapred.sh/stop-mapred.sh
start up map reduce service.
start-all.sh/stop-all.sh
start up both HDFS and map reduce service

Hadoop reads content in file slaves to get all nodes and then starts up all these nodes.

Check status of the services
HDFS: http://domain:50070/
MapReduce: http://domain:50030/

HBase

Installation instructions: http://hadoop.apache.org/hbase/docs/current/api/overview-summary.html#overview_description
The configuration file is hbase-site.xml. My hbase-site.xml looks like
<configuration>
  <property>
    <name>hbase.master</name>
    <value>pg3:60000</value>
    <description>The host and port that the HBase master runs at.</description>
  </property>

  <property>
    <name>hbase.rootdir</name>
    <value>hdfs://pg3.ucs.indiana.edu:9000/hbase</value>
    <description>The directory shared by region servers.</description>
  </property>
</configuration>

Commands
start-hbase.sh    starts up hbase service
stop-hbase.sh      stop hbase service

Note: hbase bases its functionalities on hadoop. Sometimes it is necessary for hbase to know the configuration of hadoop. Following statements are excerpted from hbase document which I think is important:

"Of note, if you have made HDFS client configuration on your hadoop cluster, hbase will not see this configuration unless you do one of the following:
  • Add a pointer to your HADOOP_CONF_DIR to CLASSPATH in hbase-env.sh
  • Add a copy of hadoop-site.xml to ${HBASE_HOME}/conf, or
  • If only a small set of HDFS client configurations, add them to hbase-site.xml
An example of such an HDFS client configuration is dfs.replication. If for example, you want to run with a replication factor of 5, hbase will create files with the default of 3 unless you do the above to make the configuration available to hbase. "

Monday, August 18, 2008

Mysql error "InnoDB: Unable to lock ./ibdata1, error: 11"

Recently, there was a power outage in the lab. I did not shut down my machines before the power outage. After I restarted my Ubuntu, I could not start up Mysql. The error was:

InnoDB: Unable to lock ./ibdata1, error: 11
InnoDB: Check that you do not already have another mysqld process
InnoDB: using the same InnoDB data or log files.
InnoDB: Error in opening ./ibdata1

But I am 100% sure that no another mysqld process was running. After I searched on line, I found that I was not the only one encountering this error. See this post.
This post has an insight into this problem. It seems to be caused by NFS. Mysql is not installed on a local file system. It is installed on a remote file system which is mounted to other file systems by using NFS.

Solution
make a copy of the original files (ibdata1, ib_logfile0, ib_logfile1...).

mv ibdata1 ibdata1.bak
cp -a ibdata1.bak ibdata1
......

Tuesday, July 29, 2008

Social Networking on Drupal

Previously, I tried several open source social networking frameworks including elgg, aroundme, peopleaggregator... However, few of them are mature and stable. So I also tried Content Management Systems. I delved into Drupal.
Drupal is an excellent CMS which has many powerful modules. Some modules provide social networking support. There exists a drupal group which promotes social networking support in Drupal.
Here I list some useful modules which may be used in social networking:
Organic Groups
"Enable users to create and manage their own groups. Each group can have subscribers, and maintains a group home page. Groups get their own theme, language, taxonomy, and so on."

Buddylist
Allows users to add other users to buddy list, organize buddies into buddy group and monitor buddies' content.

Invite
Adds an 'Invite a friend' feature that allows users to send and track invitations to join a web site.

FOAF
Functionalities:
"1. automatically import/synchronize profile information between any Drupal-powered sites
2. import profile information from external FOAF files
3. export a FOAF file based on a user's profile"

Privatemsg
Allows users to send private messages to each other.

User Relationships
Allow users to create named relationships between each other.

Wiki
interwiki
This filter provides a simplified, wiki-like syntax for linking to articles or search results on many commonly-used internet reference websites
Liquid Wiki
The Liquid Wiki Engine Project aims to build a module providing wiki funktionality to Drupal.
MediaWiki
Integrate Drupal with an existing MediaWiki installation.

Online Chat
Chat Room
This module enables chat rooms to be set up on Drupal sites. No additional software is required. Chat Room uses AJAX to update chats without page reloads. Chat rooms are nodes that provide access to chats and chat archives.
BoWoB
Free Chat for your website, integrated with your Drupal users and design. It is implemented in Flash.

Thursday, July 17, 2008

Google Calendar Demo Gadgets

I have implemented some calendar gadgets based on existing legacy gadgets.

(1) Google calendar viewer gadget
This app does not use Google Calendar Javascript API. Google Calendar generates automatically feeds for public events owned by a user. Address of the feed is http://www.google.com/calendar/feeds/username@gmail.com/public/full. This gadget retrieves public events of a specific calendar user and display them accordingly. Not all events are retrieved and displayed.
Assume today is A, then events that fall into period (A-30days) to (A + 60days) are handled.
Note: this gadget can just get public events.
I deployed it in both Orkut sandbox and Ringside.  Following screenshots are taken from Orkut.

Main page:
image

Description of various parts of the page:
image

When a user clicks the brief information of an event, detailed information will be displayed in place.
 image

(2) Standalone Google calendar client application.
This app does not rely on Gadget API or Open Social API. It just relies on Google Calendar Javascript library. So it can be run independently without gadget container. I deployed it on Ringside using IFrame.
It can be accessed by visiting http://gf1.ucs.indiana.edu:8080/gcalendar/calendar2.htm or you can use it in Ringside.

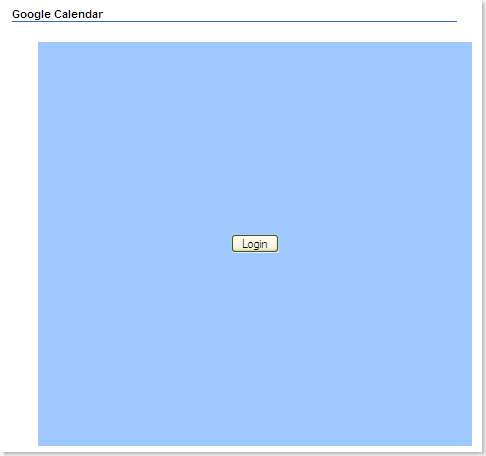
If a user has not logged in Google account, he/she will see a "Login" button.
image

After user clicks the "Login" button, he/she will be redirected to Google login page. After he/she logs in Google, he/she will be redirected to a "Access Request Authorization" page. Then the user can choose to grant or deny the access. It is shown below:
image

After the user grants access, following initial page will be displayed:
image

Description of every part in the page:
image 

When a user clicks the time range selection text box, a data picker will be displayed so that the user can easily select time period. It is shown below:
image

When a user selects his/her time range and clicks "Go" button, information of events within the specific time perios will be retrieved. And when the user clicks the drop-down box with label "Select...", a list of events will be displayed. See below screenshot:
 image

When the user selects an event, detailed information will be displayed in corresponding fields.
image

The user can modify information of an event and save it back in Google Calendar by clicking button "Save to Google Calendar".
image

(3) Google calendar gadget which allowes users to log in
This gadget is different from the first gadget mentioned above because this gadget allowes users to log in so that all events(public and private) can be retrieved and displayed. This gadget is based on the app(2) which is described above. The user interface is the same as that of app(2).
I deployed it on Ringside and Orkut sandbox successfully.

Wednesday, July 09, 2008

Demo Apps

I have written several demo apps.
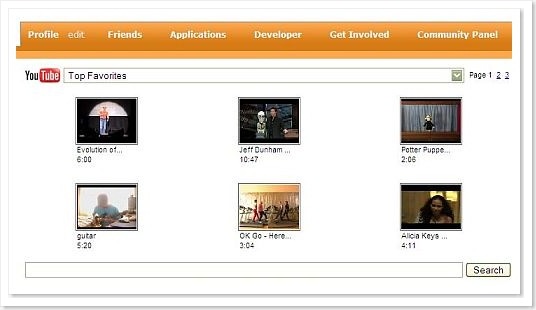
(1) A regular gadget with gadgets.* API
This is based on official youtube gadget presented here. Official youtube gadget uses traditional gadget API, which means it can not be run in open social containers.
I modified the source of official youtube gadget to make it compatible with open social API. Source is hosted here.
I run it on Ringside, and it works well. Screenshot is shown below:
ringside_youtube2_thumb1
Besides, I run it on iGoogle sandbox and Orkut sandbox successfully.

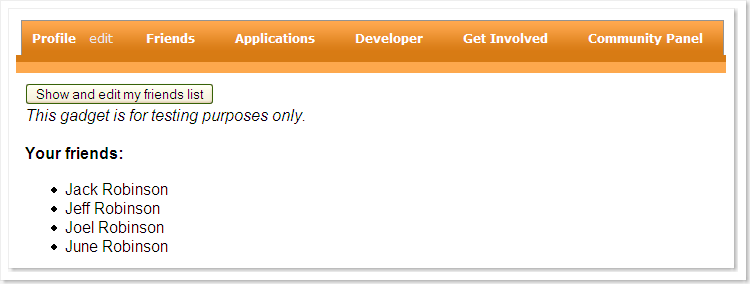
(2) An open social gadget
This gadget is written with Open Social API so that it can be run in all standard compatible containers. This gadget lists all friends you have in a container. If you add it to your Orkut account, it will list your friends in your Orkut account. If you add it to your hi5 account, it will list your friends in your hi5 account.
Source is hosted here.
I run it on Ringside, and screenshot is shown below:
image_thumb1
Besides, I run it on iGoogle sandbox and Orkut sandbox successfully.

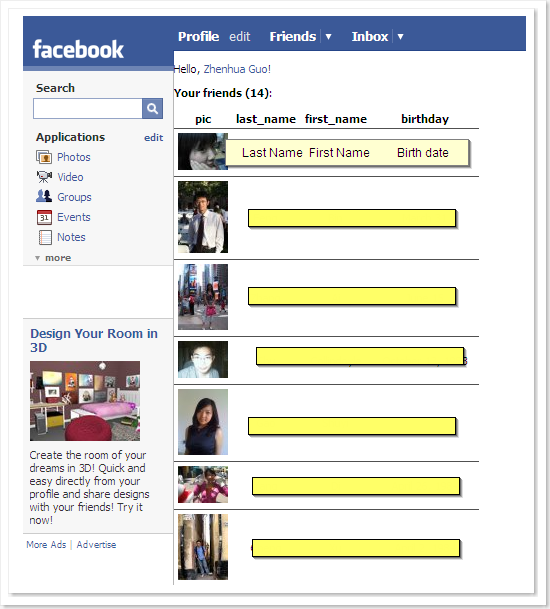
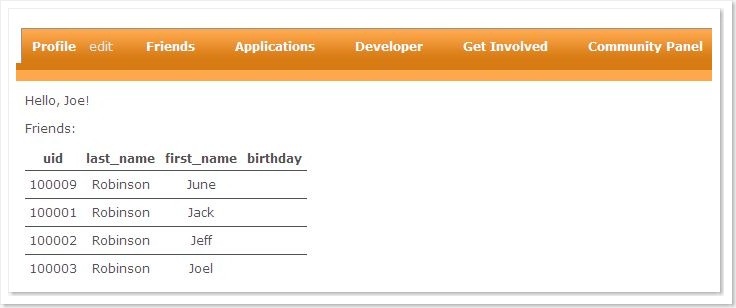
(3) A Facebook application.
This application gets your friend list on Facebook and displays related information including profile picture, last name, first name and birth date. You can see its information here. Meanwhile you can add it to your Facebook account.
Screenshot is shown below:
image_thumb3 

(4) A port of application (3)(The facebook application). 
Because Ringside implements Facebook API and FBML, application (3) should be able to be run on Ringside with minor modifications. New API key and secret should be used. Besides Ringside RESTful server (instead of Facebook server) address should be used.
Finally, I got it to run successfully on Ringside.
ringside_friend_thumb1

(5) Make Facebook to use Ringside application
I used the method described in this post and this post. It should work. But unfortunately it did not work. Currently I don't know why.

To try it in Ringside
First go to http://gf1.ucs.indiana.edu:8080/ to log in.
Then click tab "Applications":
ringside_tab_thumb2
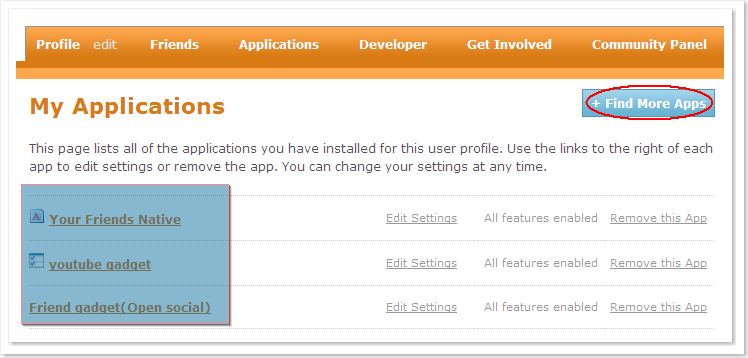
Following page should be displayed:
ringside_apps_thumb1
Main panel displays a list of all applications you have added to your account. You can click any one to use it.
Or you can click button "Find More Apps" at top right corner to browse more available apps.
Application "youtube gadget" is the application (1) described above.
Application "Friend gadget(Open social)" is the application (2) described above.
Application "Your Friends Native" is the application(4) described above.
To run application (3), you need a Facebook account and add it to your account by accessing here.

Saturday, July 05, 2008

Google Gadget and OpenSocial

Opensocial API is an open set of APIs which can be used to access various social network applications. Currently, social network apps which support OpenSocial API are listed here.

Google Gadget:
Official specification of Gadget server/container is here(http://code.google.com/apis/gadgets/docs/spec.html). It includes abundant information about how gadget container handles gadget requests from clients. The basic idea is gadget container processes gadget .xml definition file and generates corresponding HTML+CSS+Javascript and then transferres the result to end users. Variety of functionalities gadget deveoper can utilize depends on gadget container. Different gadget containers may provide different set of features. However, some APIs are mandatory and must be supported by all compliant implementations. Javascript gadget specification is here(http://code.google.com/apis/gadgets/docs/reference/). Gadget XML reference is here(http://code.google.com/apis/gadgets/docs/reference.html). This site contains many useful hints about how to develop and test Google Gadgets.

There are two set of Gadget APIs:Legacy API and gadgets.* api(used by Open Social spec).

Gadget Host:
If you don't have a web server to host the gadget XML file, Google Gadgets Editor is a tool provided by Google which can be used to edit and host gadgets. You can test your gadgets in GGE withoug logging in Google. But you cannot save your gadgets without logging in. You can add Google Gadget Editor gadget to your iGoogle homepage by accessing this site. It seems that only legacy gadget APIs are supported in preview mode by GGE. GGE just provides very simple functionalities. You can use it just as a hosting service which stores your gadget spec files. If you want more functionalities like version control, you can use Google Code Hosting(http://code.google.com/hosting/) or other full-fledged hosting services.  This site contains detailed information about how to use Google hosting services.

Legacy Gadget Container:
Besides spec files, gadget container is necessary to run your gadgets. To test legacy Google Gadgets, you can GGE or iGoogle content directory. Here contains instructions about how to publish your gadgets to iGoogle content directory. You can update your submitted gadgets using this site. NOTE: iGoogle content directory only applies to legacy gadgets.

Open Social Gadget container:
To test new google gadgets(using gadgets.* API), you should use a certain container listed here. Note: two services from Google are in the list. However, to use them, you must sign up for sandbox access besides regular logging in. To sign up sandbox access of iGoogle, visit this site(http://www.google.com/ig/sandbox). To sign up sandbox access of Orkut, visit this site. These two services are still in beta phase and thus provide limited functionalities.

Resources:
iGoogle Dev: http://code.google.com/apis/igoogle/docs/igoogledevguide.html
Orkut Dev: http://code.google.com/apis/orkut/docs/orkutdevguide.html

Friday, July 04, 2008

Interaction between Facebook and Ringside

(1) Can Ringside use applications of Facebook?
Generally not. To use applications of Facebook, one of the two requirements must be satisfied:
<1> You know the callback URL of the application.
If you know the callback URL, you can create a new application on Ringside serve which points to the same callback URL. However, as far as I know, you have no way to figure out the callback URLs of Facebook applications developed by others.
<2> Facebook exposes a "proxy URL".
In this case, Facebook does not need to expose callback URL of an application. Instead, Facebook acts as a Proxy server and sits between Ringside server and your app. Then you points "Callback URL" of your Ringside app at the Facebook "proxy URL". So the communication style is:
    your Ringside app <=> Ringside server <=> Facebook <=> Facebook App.
Facebook is a relay station which connects Ringside server with Facebook applications. However, as far as I know, currently Facebook does not support the "proxy URL".

(2) Can Facebook use applications of Ringside?
Yes. Ringside supports the second method described above.
If you has built an application on a Ringside server and you want to that application to be accessed in Facebook, you should:
[*] add a new application in your Facebook account;
[*] copy configuration information of your Ringside app to the newly created app in Facebook.
[*] set Callback URL(in Facebook setting) to point to your Ringside app. Note: there is a specific format of "proxy URL" of apps in Ringside: http://ringside_server:port/trust.php/facebook/canvas_path. You should replace canvas_path with your real value. It should be the canvas path you set in Ringside server rather than Facebook.
Note that that app is run inside of backend Ringside server instead of Facebook. So the app generates all output based on information stored on backend Ringside server. For example, if the app returns a list of your friends, you will see friend list of the profile you set up on Ringside server. In other words, you will not see your Facebook friend list.
Architecture:
draw2 
<1> browser sends request to Facebook
<2> Facebook sends request to "Callback URL" (format is: http://ringside_server:port/trust.php/facebook/canvas_path)
<3> Ringside server sends request to your app server
<4> Your app makes calls to Ringside server and integrates response into output
<5> Your app returns final output to Ringside server
<6> Ringside server passes the output to Facebook
<7> Facebook returns response to client.
One issue is: if response in step <5> contains FBML segment, who will render the FBML? Ringside server or Facebook? I guess Facebook renders FBML into HTML. In other words, Ringside server just acts as a pure proxy and it does not render inbound messages. Maybe I am wrong, I am not 100% sure about my guess.

(3) More possibilities
Actually, your app can makes use of all resources that you have privilege to access. No matter where you deploy your app, your app can makes API calls to Facebook, Ringside server and open social containers(e.g. Orkut, hi5...).
Architecture:
 draw3 
In this way, you can integrate different resources and produce better result.

Thursday, July 03, 2008

Facebook Application Development and Concepts

Developing a simple application for Facebook platform is not as easy as developing a "hello,world" application in C/C++ or Java etc.
Here is a step-by-step tutorial about how to build a Facebook app. It is exhaustive and I just supplement two cents.

Resources:
Description about the basic architecture:
http://wiki.developers.facebook.com/index.php/Random_questions 
More resources about how to build Facebook Apps:
http://www.merchantos.com/makebeta/facebook/facebook-php-tutorial/

First, it is necessary to introduce the basic concepts. These concepts confused me once upon a time.

Profile Action
When you browse profile of a user, you should see following layout:
image
The entries within red box are called profile actions. One way to set profile action of your app is through app setting interface provided by Facebook. Following entry "Default Action FBML" should be displayed:
image
You can make use of fb:profile-action to set profile action.
Another way to set profile action is use API: Profile.setFBML.

Profile Box
On your profile page, there is a small box for every application you have added. This small box is called profile box which is demonstrated below.
image
You can set content of profile box of your app by accessing app setting page:
image
Moreover, you can set profile box by using API: Profile.setFBML.
Note: Profile.setFBML can be used to set both profile box and profile action.

Cache in profile action and profile box:
Setting of profile action and profile box is cached in Facebook server. See architecture here.
Clipboard042
<1> A user sends requests to Facebook through profile action or profile box.
<2> Facebook immediately returns cached response to the user. In other words, Facebook does not communicate with your app server instantly. The cache is for per user per application.
Update of profile action/box is done asynchronously. Usually, when a user requests your canvas page, profile action/box will be updated if related code is contained in your canvas page.

Canvas Page
When a user click your app in the left navigation bar, your app will be put into canvas page which is shown below:
 image
Facebook retrieves content of the page and renders it in canvas page. By setting Canvas Page URL, you tell Facebook that your app should be accessed through the specific URL. By setting "Callback URL", you tell Facebook where content should be retrieved. Facebook platform is like a proxy. When a user uses your app by accessing "Canvas Page URL", Facebook determines the true URL that should be visited. Then Facebook sends request to the URL and renders response in Canvas Page.
image 

How does Facebook handle your app in canvas page?
See here. I briefly describe the procedure:
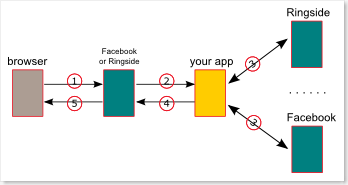
test3 
<1> browser sends request to facebook platform.
<2> Facebook platform sends requests to your app server
<3> Your app makes API calls to Facebook and integrates response into output
<4> Your app returns output(html segment with or without FBML)
<5> After facebook gets response from your app server, Facebook renders FBML to HTML and displays result in client browser.

Add a new app
After you add developer application into your facebook account, you should be able to create your own applications. There are many options you can set to customize your Facebook app, the interface looks like this:
image
And this site contains detailed information about almost every field:
http://www.marketing-ninja.com/facebook-app/starting-your-first-facebook-app-demystifying-application-form-field-by-field/

You should have a server which will host your Facebook app. If you user Apache http server, you need to configure the server so that when a directory(not a file) is requested index.php will be returned(if it exists).
In my Apache httpd server, related configuration is like this:

<IfModule dir_module>
DirectoryIndex index.html index.php
</IfModule>

Wednesday, July 02, 2008

Ringside application development

Table of Content

Ringside Social Application Server seems a promising project. However, because it is still in beta development, online documents are not well organized. A better directory layout may help a lot. After reading the documents and trying Ringside server myself, I got some experience which is shared in this post.

What Ringside server can do?

(1) Open Social container.
It means all open social applications can be run on Ringside server. Of course, the open social applications should not use extensions provided a specific container( e.g. iGoogle, Orkut ) if you want these apps to run on Ringside server.
Note: Gadgets in Google content directory(repository of traditional gadgets) can not be used on Ringside server because traditional Gadget API is different from new Gadget spec used by Open Social API.
(2) Facebook platform mock
It supports FBML and Facebook API and adds some extensions, which means you can use the same function names and markups of Facebook to write your Ringside apps.
(3) Extensibility
Because Ringside server is open source, users can customize and extend Ringside server in the way they wish. For example, users can add their new APIs and extend XML tags to provide customized tags.

How to add and set up a new app?

Add a new app:
First click "Developer" tab, and in the main panel click "Create a New Application", following picture should be displayed:
image
When you create a new application in Ringside, the procedure is well similar to that of Facebook. The configuration options are almost the same as well. Look at below picture:
image 
One big difference is highlighted in the picture. In Facebook, you can just choose your app type between "Use FBML" and "Use IFrame". However, in Ringside server, one more option("Use Open Social") is supported. The key thing you should configure is "Callback URL" which points to the location of your application. For option "Canvas URL", you just need to specify a unique name and you must not specify the full-path URL. Prefix is implicit which is http://ringside_server_domain:port/canvas.php/. So if you specify "myapp" as your "Canvas URL", the URL to access your app becomes http://ringside_server_domain:port/canvas.php/myapp.
Note!!! When you set "Callback URL", you had better not use loopback domain or ip(e.g. localhost, 127.0.0.1) as host. If type of your app is "Use FBML", it may work well. In this mode, the output content is fully contained in the response. However, if type of your app is "Use IFrame", your app may not work. In this mode, a frame element is embedded in returned html and src attribute is set to point to the "Callback URL". As a result, the browser will send requests to its local host (the host a user is using to try your app) instead of the server which hosts your app. After you deploy and publish the app, using loopback address will definitely cause problems. To make your app work both in FBML mode and IFrame mode, loopback address should not be used!!!

Develop your own Ringside applications in PHP

See instructions here. After you get PHP library, generally you need to modify your php.ini and append path of the library to variable include_path so that PHP interpreter knows where to look for Ringside PHP library.
You applications do not need to be hosted on the same host as Ringside server. Ringside provides a PHP client library which can be used to ease PHP development. Ringside PHP client library is based on Facebook PHP client library. But Ringside wraps the code in original Facebook PHP client library. In original Facebook PHP client library, the rest server which you send requests to is hard-coded in the source code as "http://www.facebook.com". There is a class in Ringside library called "RingsideApiClients" which is a subclass of class "Facebook" and overwrites most of the inherited functions. Besides, Ringside adds some extra APIs which are mainly contained in class "RingsideApiClientsRest"(It is a subclass of class "FacebookRestClient").
So, you should use class "RingsideApiClients" to send requests to backend Ringside server. One thing your must do is configure the Ringside server URL so that your app knows where requests should be sent. There are two ways that I know:
(1) When you create an instance of RingsideApiClients, you can send weburl, serverurl and socialurl as parameters of contructor.
Prototype of the constructor is :
public function __construct($api_key, $secret, $webUrl = null, $serverUrl = null, $socialUrl = null, $client = null ).
(2) Change static variable in class RingsideApiClientsConfig.
Sample usage:
RingsideApiClientsConfig::$webUrl= ringside_web_url;
RingsideApiClientsConfig::$serverUrl = ringside_server_url;
RingsideApiClientsConfig::$socialUrl = ringside_social_url;

Extend API provided by Ringside Server

Good resource (1), (2).

Add your own tags to Ringside server

Good resources (1), (2).

Tuesday, July 01, 2008

Ringside Networks Social Application Server on Linux


This post is based on official documents from Ringside, and describes steps to set up Ringside Networks Social Application Server.
(1) Download
First, download the app server from here. In the distributed package, all dependent packages/libraries are included. Main additional components include: Apache2, PHP5 (core package and some extensions), Mysql and some unix/linux tools(e.g. curl, tidy and their libraries). So size of the whole package is sort of big. But it is an all-in-one package so that you can easily make it work without much configuration. Installation directory structure is explained here.
If you don't want the all-in-one package, check instructions here to individually set up your environment.

(2) Install
A GUI installation wizard is provided. You can get instructions here. The process is easy.

(3) Config
You can change various apache setting by modifying following files:
(*)%RNAS_ROOT%/apps/phpmyadmin/conf/phpmyadmin.conf
//This conf file is related to using of phpmyadmin. By default, users can only access phpmyadmin from IP 127.0.0.1. You can modify it
//if you want to use phpmyadmin from remote client.
(*)%RNAS_ROOT%/apps/ringside/conf/ringside.conf
//
ringside related conf. It sets where the document root is... Generally, this file should not be modified.
(*)%RNAS_ROOT%/apache2/conf/httpd.conf
//General apache http server configuration is in this file. If you want to change the port, set it here.

(4) Run
Let me assume you installed Ringside Networks Application Server into directory %RNAS_ROOT%. Under directory %RNAS_ROOT%, you should see a script called "ctlscript.sh" which can be used to start/stop/restart server components. Sample commands are shown below:
./ctlscript.sh start                    //start both apache and mysql
./ctlscript.sh stop mysql           //stop mysql
./ctlscript.sh status apache       //get status of apache server.
Official document is here which has more information.

(5) Setup/Initialization
First, you need to access http://your_ip_or_domain:port/setup.php. Default port is 8080. Then the server will carry out some setup work. For example, a database called ringside is created...
You should see following page:
image

(6) Test/Using
Main page: http://your_ip_or_domain:port
Phpmyadmin access: http://your_ip_or_domain:port/phpmyadmin.
Login: http://your_ip_or_domain:port/login.php. When you run initial setup in step (5), a user is automatically generated for you. See content in the green box in last picture.

(7) upgrades
[*] Upgrade via PEAR:
You can update Ringside source via PEAR. Instructions are described here.
[*] Check out latest code:
You can checkout latest Ringside code and build your own development/deployment environment. You should install the all-in-one package first. By following instructures here, you substitute new version of Ringside for the original one which is included in the all-in-one package.

(8) Remove
Use executable uninstall. Check instructions here.

Thursday, June 19, 2008

Client side techniques

Namespace mimic in Javascript (similar to technique used by YUI):
namespace:   function(   sNameSpace, obj   )   {  
    if   (!sNameSpace   ||   !sNameSpace.length)   {  
        return   null;  
    }  
    var   levels   =   sNameSpace.split(".");  
    var   currentNS   =   CGL;  
    //   CGL   is   implied,   so   it   is   ignored   if   it   is   included  
    for   (var   i=(levels[0]   ==   "CGL")   ?   1   :   0;   i<levels.length;   ++i)   { 
        if( arguments.length == 2 && i == levels.length - 1)
	    currentNS[levels[i]]   =   obj;
	else
	    currentNS[levels[i]]   =   currentNS[levels[i]]   ||   {};  
	currentNS   =   currentNS[levels[i]];  
    }
    return   currentNS;  
}
By default, following namespaces are supported:
CGL.mashup.resourcetype:
This object maintains resource types we support. Currently, text, image and video are supported.
CGL.mashup.addr:
This object maintains base path for our applications.
CGL.mashup.sites:
This object maintains all backend sites we support. Currently, Youtube and Flickr are supported.
CGL.mashup.log:
This object maintains request history so that in the future we can reinvoke a certain old request.
CGL.mashup.init:
All initialization work is done here.
CGL.mashup.urlbuilder:
This object provides functions which can ease construction of request URL to access various resources.
CGL.mashup.service:
This object provides functions which send various requests (e.g. get user information) to server side.
CGL.mashup.helper:
This object includes some utility functions.
GL.mashup.htmlformatter:
This object contains functions that can be used to display response in a specific format .
CGL.mashup.jsonresponse:
This object handls JSON responses from server and parses the content.
CGL.mashup.opmapper:
This object maps operation names to concrete function implementations. Callback can be specified as well.

Web2.0 Integration Summary

The server-side architecture is described here:
http://zhenhua-guo.blogspot.com/2008/05/mashup-architecture.html.

Authentication: OpenID which is described here (http://zhenhua-guo.blogspot.com/2008/05/openid.html).
Authorization: Although OAuth seems promising, it has not been supported by large web 2.0 applications. So, I make use of various authorization mechanisms of different applications.

RESTful web services are used instead of SOAP-based web services. URL pattern used to access various resources is described here(http://zhenhua-guo.blogspot.com/2008/05/url-pattern-in-mashup.html).

At client side, Ajax is used to enhance user experience. Client side functionality is described here(http://zhenhua-guo.blogspot.com/2008/06/client-side-techniques.html).

Sunday, May 25, 2008

OAuth

In my mashup framework, OpenID is used to do authentication which provides a way to make sure the users are really who they claim to be. The mechanism is that the users prove that they own/control the OpenID they provides. Here is what I wrote about OpenID.

However, OpenID just solves authentication. After users are authenticated, OpenID does not specify how the third-party apps access the protected data on service providers. And the requirement that third-party apps can access protected data stored on service providers on behalf of users is not imaginary, but real. In my mashup framework, I need to manipulate data on behalf of users which needs authorization besides authentication. Youtube and Flickr both provide ways for third-party integration. They provide similar authorization procedures (I am using this mechanism right now) which fundamentally match principles of OAuth specification.

OAuth provides a way for users to grant access to third-party apps. The procedure is pretty much the same as OpenID. What is different are parameters in requests and responses. OAuth is an independent specification which means it is not an extension of OpenID. But, in my opinion, it may be better to combine these two together because they are similar to each other. In this way, user experience can be improved because authentication and authorization can be done in the same pass instead of two. However, some sites may just support authentication service or authorization service (in terms of support of open standards like OpenID, OAuth). So how to combine them together without losing flexibility is an issue.

One problem that OAuth does not address is fine-grained access control. I think this issue must be addressed in the long run. However, nowadays, the goal is too far to reach. Actually, current version of OAuth is not supported widely.

DataPortability is a new organization which aims to promote data portability. Of course, it includes OpenID and OAuth with respect to authentication and authorization data portability. I am not sure which ones will survive and stand out  eventually, but this is a good signal that data portability is being considered as a critical issue and I hope it will be addressed in the near future.

Saturday, May 24, 2008

Authentication and Authorization in Mashup

Authentication
Currently, I don't build my own independent user authentication system. I make use of OpenID to utilize existing authentication systems, such as Yahoo Flickr, Google Blogspot, LiveJournal... You can check whether you have already had an OpenID here. I wrote a simple introduction. In essence, we delegate the task to existing authentication systems.
After a user is authenticated successfully, OpenID is used to track the user. Servlet session technique is used to associate session id and user information.

Authorization
Currently, I don't ask end users for their usernames and passwords in existing services (e.g. youtube, flickr) because it requires deep trust of end users. The user id redirected to an authorization web page hosted by the destination service(e.g. youtube). If the user accepts the request, then the user browser will be redirected to my mashup application. Generally, an auth token is appended to the URL which will be used in following requests.
Currently, for every backend service, I request the user to authorize the most powerful privilege level. For example, if the service supports READ and WRITE permission control, my application will request WRITE permission. If the service supports READ, WRITE and DELETE permission control, my application will request DELETE permission. This is not always a good strategy. But because of diversity of permission control systems, I must choose the mechanism which can be used in every possible service.
Maybe in the future, I can come up with a better framework with fine-grained access control.

URL Pattern In Mashup

URL Pattern

Note: All variables enclosed in ‘{’ and ‘}’ must be substituted with real values.
GET means HTTP GET request type and POST means HTTP POST type.

/cgl/feeds/api/{category}/{service}/users/{userid}
GET:
    Get information of a user.

/cgl/feeds/api/{category}/{service}/login
GET:
     Login the service.

/cgl/feeds/api/{category}/{service}/users/{userid}/resources
GET:
    Get all resources of the user.
POST:
    Add a new resource.

/cgl/feeds/api/{category}/{service}/users/{userid}/resources/resourceid
/cgl/feeds/api/{category}/{service}/resources/resourceid
GET:
    Get information of a specific resource.
DELETE:
    Delete the corresponding resource.
PUT:
    Update the corresponding resource.

/cgl/feeds/api/{category}/{service}/resources/resourceid/comments
GET:
    Get all comments of the resource.
POST:
    Add a new comment.

/cgl/feeds/api/{category}/{service}/resources/resourceid/rating
GET:
Get rating of the resource.

/cgl/feeds/api/{category}/{service}/tag/{tag}?perpage={perpage}&page={page}
GET:
    Get records by tag. Parameter perpage indicates how many resources you want to retrieve.Parameter page indicates which page you want to retrieve.

/cgl/feeds/api/{category}/{service}/statistics/{standard}? perpage={perpage}&page={page}
GET:
    Get records by standards.
    E.g. most viewed, most recent…

Example:

/cgl/feeds/api/videos/youtube/tag/soccer
get resources tagged as soccer.
/cgl/feeds/api/videos/youtube/statistics/most_viewed
get resources that are most viewed.
/cgl/feeds/api/pictures/flickr/users/testuser/resources
get resources belonging to user testuser.

Friday, May 23, 2008

Javascript Templates

Javascript Templates(http://code.google.com/p/trimpath/wiki/JavaScriptTemplates) is a sub project of project Trimpath. It is a client-side template engine whose functionality is similar to server-side Velocity and Smarty engines. It uses special markup syntax. Besides simple template matching and replacing, it also supports simple control flow, loop and variable declarations... Now I summarize the syntax:
Statements:
(1) Variable Declaration
Syntax Example
{var variable}
{var variable = value}
{var price}
{var price = 10}
Note: No ending ';' is needed.

(2) Control Flow

Syntax Example:
{if expression}
    {elseif expression} ...   
    {else} ...
{/if}
{if price > 10}
    {elseif price <20}...  
    {else}...
{/if}
Note: No surrounding brackets are needed in test expression. No white space between first '{' and 'if'.

(3) Loop

Syntax Example
{for varariable in list}
   statements go here
{/for}
{for price in pricelist}
    ${alert(price)}
{/for}

(4) Expression

Syntax Example
${expression} ${car.brand}
${expression|modifier} ${car.brand|capitalize}
${expression|modifier1|modifer2} ${car.brand|default:"chevy"|capitalize}
... ...

Value of the expression will be returned.

Note:
Statement for( ; ; ) is not supported.
These statements are parsed and processed by Javascript Template Library instead of javascript itself.

More:
(5) CDATA Text. Tag is cdata.
CDATA Text will be ignored and will not be processed.
(6) In-line javascript block. Tag is eval.
Multiple line javascript code can be put in a single block to evaluate.
(7) If you have multiple-line js code, you can use minify to tell processor to treat them as a whole.
For example:
<input type="button" onClick="{minify} Javascript event
handling code...
{/minify}">

Note: eval and minify are different althought they are sort of similar.

How to process templates?
API: http://code.google.com/p/trimpath/wiki/JavaScriptTemplateAPI.
Commonly used functions:
(1) TrimPath.parseDOMTemplate ( elementId, contextObject )
This function retrieves content of the element corresponding to the first parameter. It should be a textarea element and its should be hidden.
The second parameter is a context object and it will be "merged" with the template. For example, if a template refers to ${car}, then the processor tries to access contextObject.car.
(2) TrimPath.parseTemplate ( templateContentStr )
This function accepts a string as template instead of a dom element id.
You can parse a string template in this way:
TrimPath.parseTemplate( stringvariable ).process( contextObject ).

Variable Resolvation Precedence:
There are three kinds of scopes:
(1) Processor scope: it consists of all template statements.
(2) Context object scope: All properties of the context object.
(3) Local scope: local variables whic are not defined in template.

Case 1: In template expression and {eval}:
Processor scope is checked first, then context object is checked. At alst, local scope is checked.
For example:
    var data={car : "chevy"};
    var str = '${alert(car)}';
    str.process(data);        //alert "chevy"

    var str2 = '{var car = "ford"} ${alert(car)}''
    str2.process(data);      //alert "ford"

    var car = "toyota";
    var str3 = '${alert(car)}';
    str3.process();      //alert "toyota"

Case 2: All variables defined in template do not have effect in local scope.
For example:
    var str = '{var car="chevy"}${alert(car)}';
    str.process(data);        //alert "chevy"
    alert(car);                   //variable 'car' is not defined.